Studio Musings

Wednesday, February 27, 2013

Choose Your own Adventure Challenge Wrap-up and Additional Thoughts

Freeform peyote jewelry by Betty James, Deborah Humphrey, Cynthia Machata and Debbie Rasmussen (clockwise from top left)
Additional entries to the Choose Your Own Adventure challenge
 If you haven't already done so, I highly recommend you take some time to peruse the list of adventurers in the Freeform Peyote Choose Your Own Adenture Challenge.  It's a true celebration of seed beads, bead weaving and the creative spirit as each piece is completely unique.

I've updated the list to include several people who for one reason or another didn't make it into the initial Saturday reveal.  My apologies for the difficulties on my end!  I'm listing the additions in this post as well.

  
Additional Adventurers:
Cynthia Machata
Debbie Rasmussen
Betty James
Deborah Humphrey


Allowing yourself the adventure

In my opinion, part of what made the Choose Your Own Adventure challenge such a delight was the sheer diversity of styles and talents.  We had everyone from people playing with freeform peyote for the first time through seasoned masters showcasing their art and craft.  At all levels, I saw an overabundance of creativity, curiosity and play.

But what I saw behind the scenes made me a little sad.  As one of the hosts of this challenge, I fielded quite a few emails from people who weren't sure their work was up to snuff to be included.  Every piece they referred to had something wonderful to recommend it.  But even if it didn't, even if it was a complete and total disaster (which none were), the most important thing would have been that they explored the medium. And maybe, with a little luck, they enjoyed the process.

There's a quote in her wonderful book, The Artist Way, where Julia Cameron reminds us that 'Anything worth doing is worth doing badly'.  What I believe she's saying here is:

1) Don't compare yourself to the masters when your just getting started.  It's not fair to you, it's not fair to your work.  And frankly, it's not fair to the people who've put in the time and effort to become masters. 

2) If it's something you feel passionate about, then Go For It!  Don't worry about whether your first piece is perfect; it doesn't matter.  What matters is that you're doing, trying, learning.  Everything gets easier with practise.  So if the first whatever it is doesn't turn out right, try again.  And keep trying. Because the corallary to 'Anything worth doing is worth doing badly' would obviously be something along the lines of 'Anything worth doing is worth putting in the effort until you can do it well'. 

This is a reminder to myself as well.  What would I be willing to try if I didn't have to do it perfectly?

Tales from the Road - Freeform Peyote by Deborah Humphrey

While challenge was named 'Choose Your Own Adventure', this particular entry truly is a tale from the road.  Deborah Humphrey sent the dispatch in while on holiday in Thailand!  Unfortunately, due to the time differences and Internet difficulties on both ends, it didn't make it quite in time for the general reveal.  So here's the trip report from Deborah:

freeform peyote necklace in progress by Deborah Humphrey
Here is my piece, an unfinished necklace that I don't really have a name for ...however, it was your work that inspired me to start freeform . In particular it was a bracelet on your website in orange (and pinks, i think ) that really caught my attention. I love the creativity and roaming in freeform (and how all mistakes can be made to look like intentional curves!).

I like buttons and those attached are from the 1950's, I really like the idea of 'functional' with a quirk and this is what the mixture of freeform and the buttons made me think of. As I have been writing about this, I have been thinking of the flickering in the old British 1950s electric fires and women sitting sewing by the fire....but enough romanticism from me!!!

I love freeform and will certainly be doing some more.


{Editor's note:  based upon the colors she mentioned I think the piece Deborah refers to above is my Coral Dancer bracelet, which made it's first blog appearance  as an UFO necklace, then reappeared as a finished bracelet in this blog post.}

Saturday, February 23, 2013

Freeform Peyote Choose Your Own Adventure Reveal

Today is a very special and exciting Saturday! 
 A little over a month ago,  Mandi and I issued the challenge that like-minded bead weavers join us in exploring the medium of Freeform Peyote.   By it's very nature, freeform peyote is an abstract art form - no set pattern, no hard and fast rules.  Instead; an open-ended canvas for creativity.  Thirty six amazing women took us up on the challenge.

Today, it all comes together in the first Freeform Peyote Choose Your Own Adventure Challenge and Blog Hop.  While I expect to see many amazing pieces, this challenge focuses as much on process as on completed projects and we've asked everyone to share their stories as well.  Visiting the participants' blogs in preparation for today, I've been thrilled to see so many of you sharing just that, while holding back the final reveal for today.

I can't wait to see everyone's work and read their 'travel journals'!  I invite you to join me in exploring what they tried, what worked and what didn't, as each designer acts as a tour guide and forward explorer into the wilds of their creativity.  

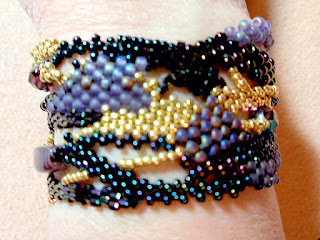
My projects  I really debated what to do for my own entry, but I wanted to keep it simple and keep it process oriented. I decided to work on a bracelet, and explicitly share the process here in on my blog in two earlier blog posts on First Steps and The Ugly Duckling Stage.  Here now, I'll share the finished piece.  May I present, Winter Blues (as in Chase them Away):

A look at the full length of the completed bracelet
Visually, the bracelet above and below has come a long ways from its ugly duckling stage.  However, in terms of working time, I completed more than two thirds of the stitching in my first two posts.  Between my previous post and here, I simply had to fill in the awkward gaps and keep moving colors until my beadwoven band roughly equaled the width of my stone focal.  


I added a small amount of top work, using over bridges very sparingly in the bracelet as I was already quite pleased with the color movement and shapes.  I added the mother of pearl button last thing.  It's larger than many of the buttons I use - large enough that it definitely acts as an alternate focal as well as the clasp.

So that's my take on the challenge.  


Adventurer Roster  Now it's time to go visit the other intrepid adventurers (updated Feb 27, 2013):
 

Mandi Ainsworth - Adventure Guide
Karen Williams - Adventure Guide

Bobbie Rafferty
Sarah Meadows
Katherine Gale
Leanne Kirsch
Jean Hutter

Nancy Dale
Judy Riley
Natasha Wiegelman
Pam Chesbro
Romana Tschunko

Bette Greenfield
Mary Harding
Melody Marie Murray
Shirley Moore
Marj

Sally Russick
Therese Frank
Tanya Goodwin
Christine Altmiller
Lea Paličková
Ivona Šuchmannová

Kay Haynes
Tammy Bowman
Alisa Lehman
Lori Callahan
Tami Norris

Jane Kettley
SaraBeth Cullinan
Julie Schmidt Bowen
Tammi Clapper

Additional Dispatches:
 Cynthia Machata
Debbie Rasmussen
Betty James
Deborah Humphrey


Trying Your Hand at Freeform Peyote.   If you've considered trying your hand at freeform peyote and would like to ease into the medium,  hop on over to the Freeform Peyote Group on Facebook for a great support network and links to a number of great freeform peyote resources.

And if you'd like a bracelet similar to Winter Blues, I am putting together two bead kits that will be available on my Etsy store sometime this weekend (I'm running a little behind).

The kits will contain all of the beads that I used in my bracelet above (right now I only have enough of everything for two complete kits) as well as the most detailed photo notes I've ever taken regarding my process, including lots more photos than fit in the three blog posts. 

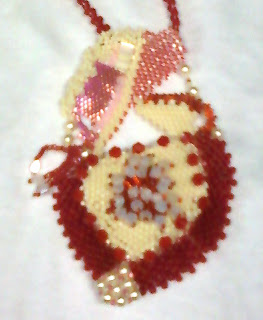
Tammi Clapper - Valentine's Day

Several of the Adventurers on our Freeform Peyote Challenge don't currently have their own blogs, so I'm hosting them here as guest posts.  Tammi was one of the first people to sign up for the challenge, but contacted me two days ago to say she had to bow out.  I discovered that she'd finished the piece, but her "critic said it was too big, too busy, and ugly."  After talking with her, she agreed to send me a picture of her piece, and then agreed to go ahead and join in the reveal and I'm so glad she did.

Here's Tammi Clapper talking about her first piece, a freeform peyote pendant.

Valentine's Day freeform peyote pendant by Tammi Clapper

detail, Valentine's Day by Tammi Clapper
My inspiration for my piece was Valentine's Day and more importantly my love for beading and trying every type of beading pattern ever made. I also am hoping that by doing freeform peyote it will lead me to hopefully develop my own pattern.

I love the colors and mixture of different size, texture and shape of beads I used to develop this first freeform masterpiece! Would I do things differently....of course there are a few things I would change, but for my first piece I think I got the general idea!

 
Return to the full list of Freeform Adventurers.


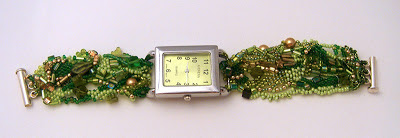
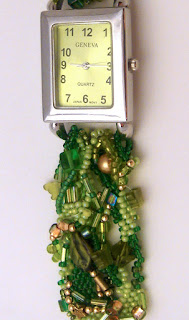
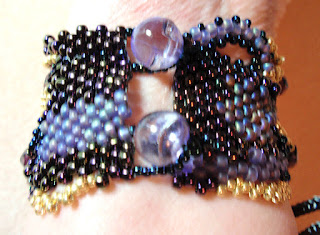
Bette Greenfield - Freeform Peyote Watchbands

Several of the Adventurers on our Freeform Peyote Challenge don't currently have their own blogs, so I'm hosting them here as guest posts.  Here's Bette Greenfield talking about her freeform bracelet and watchband designs:

Freeform embellished cuff by Bette Greenfield


I made this bracelet by decorating the top of a plain brown peyote band. The color patterns of the peyote band are freeform designed as well, and I used the band to anchor the threads.  I made this for a local art show and it sold in the first minutes of the opening.  


freeform peyote watchband by Bette Greenfield

detail, freeform peyote watchband by Bette Greenfield
I am a great fan of Freeform Beading.  After learning how to do many beading stitches by reading magazines and taking classes at local shops, I didn't want to continue copying other bead artists work.  It didn't feel right to me.  So I decided that freeform beading might be right for me.  

I Googled everything I could find on Freeform beading and found that this was the style for me.  I practiced with different colors and sizes, peyote and right angle weave, ripped and tossed, ripped and tossed and I eventually began to do combinations I liked.  And still, I wanted to do something different.  Enter freeform watch bands.  I practiced over and over again until I learned how to work the band firmly onto the watchhead.  

I still have not learned how to adjust the length for different size wrists. Advice anyone? 
  

Return to the full list of Freeform Adventurers. 

Alisa Lehman - Freeform Peyote Adventurer

Several of the Adventurers on our Freeform Peyote Challenge don't currently have their own blogs, so I'm hosting them here as guest posts.  Here's Alisa Lehman talking about her wonderful piece that seems right at home Under the Sea:


Alisa Lehman's first freeform peyote bracelet

This is my first try at freeform peyote -
 
detail of Alisa Lehman's first freeform peyote bracelet
I started by laying out some beads – I already had some left over beads in blues and greens from another project so I started with those.  There were a few colors of size 8 and some larger assorted beads.  I added some size 6s that I had hanging around, some bugles, some drops and some 15s.
 
I started the process by using a tutorial I found by Beki Haley that suggested making the first length of beads the length of your bracelet and starting with just one size.  I did that and just kept building out and adding bridges.  

For quite a while It went through an ugly duckling stage.  I liked a few bits, but some of the edges were rippling and some of the beads did not play nicely together.  Then I started embellishing the top and it started coming together.  When I finished, I felt like it needed a little something more and I found the starfish in my stash.  It seemed to work well with the blue/green ocean colors so I popped it on right on top of some of the top level embellishments (in hindsight, it would have probably been better to have added it early on and embellished around it.  I felt I need to balance the starfish color, so I added the 3 round gold beads on each side.
 
I used a glass button I had for a clasp.
 
I really enjoyed to process and I have already laid out my beads for my next bracelet (see photo at left).  

If that goes well, I would like to try a necklace.

Return to the full list of Freeform Adventurers.
 

Kay Haynes and Vintage Wine

Several of the Adventurers on our Freeform Peyote Challenge don't currently have their own blogs, so I'm hosting them here as guest posts.  First up is Kay Haynes, talking about her first freeform peyote piece, a bracelet she's named 'Vintage Wine':

Vintage Wine - full view, freeform peyote bracelet by Kay Haynes
Vintage Wine, freeform peyote bracelet by Kay Haynes

Vintage Wine - back view, worn with buttons, freeform peyote bracelet by Kay Haynes
Vintage buttons from her 88 year old friend
I used two vintage glass buttons given to me by my 88 yr old friend.  She has collected buttons since she was a young girl.  I drool every time I look thru them.  I picked beads from my favorite color scheme so that was fairly easy to do. 

I learned that it is NOT as easy to do freeform with no pattern and no rules since I am a person who needs structure and a pattern (or thought I did).  


Vintage Wine - front view when worn, freeform peyote bracelet by Kay Haynes
front view of Vintage Wine in situ
I did not do any embellishing on my bracelet because I loved it the way it is.  Our local craft store has asked if I would teach a class in early April.  So, I will definitely be making more.  I'm working on a second one now that has beach colors and shells.  I'm in love with freeform peyote.  Wanted to try it for a long time and now that I have completed one, I'm going to be making more for sure.

I love the way my bracelet turned out.  It was so much fun to just go with the flow.  Thank you so much for allowing me to participate in your adventure.  - Kay

Vintage Wine - process photo, freeform peyote bracelet by Kay Haynes
a process photo from the making of
Return to the full list of Freeform Adventurers.

Friday, February 22, 2013

Value, Texture and Line - Monochromatic Compositions

This week's Focus on Life prompt is Monochrome.  Color is the single most personally important element in my art work.  Color is what drew me to seed beads in the first place - those pure pixels of color in the form of tiny glass beads.

When you take away color, you're left with value, texture and line.  I found myself looking for these elements every where I went this past week.  

In particular, I found myself noticing all the public art work which ignores color completely, focusing on the other design elements.  My favorite I've decided it this window screen on one of the parking garages downtown.  I love the overlapping, concentric circles, like ripples in a pond.


Wednesday, February 20, 2013

Freeform Peyote Bracelet - the Ugly Duckling Stage

The Ugly Duckling Stage, freeform peyote bracelet construction by Karen Williams

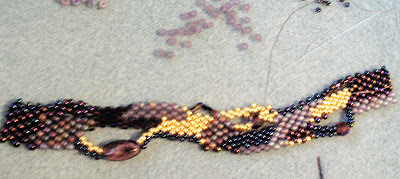
This is Part Two of my freeform peyote bracelet tutorial.   Part One focused on getting started.  Today we're looking at the Ugly Duckling state; that mid point between starting out and completion when nothing quite seems to work and it all looks sort of spindly and awkward.   Every freeform peyote bracelet I've ever worked on, in fact almost every single freeform peyote project, goes through an Ugly Duckling stage.  For some this stage lasts longer than others.


detail - starting the under bridge, freeform peyote bracelet construction by Karen Williams
The underside of my stone cabochon
Support for the Central Stone
In the photo above, we're just a little further than we were at the end of Part One.  I'm continuing to work along the full length.  At this point, rather than running my needle through the central stone bead, I run it through an under bridge of seed beads a couple of times to give it more support.

The under bridge helps provide support and stability for my central stone bead, without completely obscuring the bottom face of the stone.

After a couple of passes through the single line of beads, I peyote stitched along two thirds of it.  This will give me easy anchors for later work.

This is also the point where I need to decide which side faces forward.  I decided that the side with more cream would be the underside. 


Building a Half Bezel
Next, I focused on the side bridge (it's under my thumb in the photo above left).  Using peyote stitch I built up a bezel that cups around the edge of the stone.  This will help to hold the stone steady while leaving as much of the stone visible as possible, both from the top and bottom.  This is entirely and aesthetic choice on my part.


The half bezel itself looks pretty good, but its connection to the rest of the bracelet is awkward at best.  Something I will have to work on before the bracelet is complete.

Note that I've also started adding a new section of size 6 beads along the lower right edge and am continuing to peyote stitch around the button loop to give it a more substantial look.  

Continuing to Build - One Section at a Time
From here on out I'll be working sections at a time, rather than consistently working along the full length. 

Building one section at a time, freeform peyote bracelet construction by Karen Williams

Along the lower right edge, I've built up the section of size 6s.

Above, I'm using bridgework to tie the bracelet band into the half bezel.

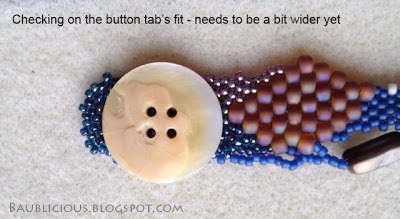
And to the far left, I've built up the area where the button will go using basic peyote stitch and size 11 seed beads.  Since the button will cover any stitching in this section, there's nothing fancy here, though I did make a color change.  I also peyote stitch around the end to soften that edge, starting after about the fifth row.  The shape kind of reminds me of a tongue depressor  - not a terribly appealing thought.

Trying the Button Placement
detai - testing button placementl, freeform peyote bracelet construction by Karen Williams

When I 'try' the button on for size and suddenly it doesn't look so bad.  In fact, it really needs to be a little wider to full support the width of the button visually. 

The bracelet is about halfway done at this point.  It is still in it's Ugly Duckling stage, but is almost ready to molt into it's swan plummage.  Next steps will include continuing to build the width, working a section at a time.

I also want to focus on integrating the bracelet band into the half bezel cupping my central stone and continuing to move colors through the piece so it doesn't look splotchy.  Ideally, I'd like each color to show up in at least three different areas to give the piece a sense of repetition and balance.

Once I've reached the full width, then it will be time to look at the possiblity of over bridges, which can be used to tie color sections together and to add more textural interest.  One of the last things I will do is add the button.

Want to see it complete?  Check back on Saturday - I'll be revealing the finished piece as part of the Choose Your Own Adventure Freeform Peyote Challenge.  Not as fancy as some of the pieces you'll see on Saturday, but it's all about process. 

Friday, February 15, 2013

Focus on Life 7/52 - First Blooms of Spring


After a week of cloudy weather, the sun burst through the overcast and it truly felt like spring.  Especially when I spied these flowers hiding under a winter bare tree on my walk home.  I've always loved snowdrops, and this one was so open it reminded me of a starburst.

And walking up my front steps, I found these:


I can imagine them opening to the sun's warmth, then slowly furling again as the day crept into shadows and on toward evening, which is how I found them.  I can't wait to see them fully open tomorrow! 


Thank you Sally, for your photo essay prompt for this week:  Beauty of Flowers.  It reminded me to look around me as I walked through the neighborhood this week, and to track all of the wonderful signs of spring.

And thank you for stopping by for a visit.  To see more responses to this week's prompt, don’t forget to visit Sally's blog for the list of all the wonderful people participating in this week's  “Focus On Life” 52 Photos.


Thursday, February 14, 2013

Freeform Peyote Bracelet - First Steps

Playing with bead selection for a new bracelet.
 I am thrilled and amazed by the enthusiasm expressed in the still-new Freeform Peyote Facebook Group.  A number of you are new to the medium and I've loved seeing your first projects!  And I'm thrilled with how many of you have joined the Choose Your Own Adventure Challenge.

I'd originally planned to put together a series of posts on the basics of freeform peyote, but as often happens, life got in the way.  Talking with my husband this morning, I wished that I'd managed to start earlier, as now that we were halfway through the challenge it's seemed a little late.  He disagreed, saying that it's never too late.  So I'm writing this post because he said I should.

Starting a new project:

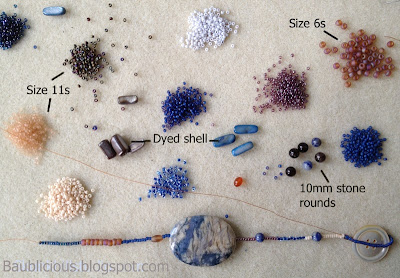
Step 1:  Choose your beads and color scheme.  Above, I used the large stone bead in blue and cream with veins of sienna to help guide my color selection.  Not all of the beads shown above will make it into the final piece, but I like having options.  My plan here is to make a bracelet.

The Starting Row:

Starting row of freeform peyote bracelet by Karen Williams, copyright 2013

Starting out, I measured about a teaspoon each of a number of my seed beads onto my beading mat and added a few of my smaller accent beads.  I then strung my initial row of beads, adding a loop that fits my button just a little bit loosely at the end.

The working length here is just over eight inches.  Note that I didn't try to use all of my bead types in this first pass.  There will be time to add more later.


Stitching Back along the Length

Starting to work peyote stitch, freeform bracelet tutorial by Karen Williams, copyright 2013


Coming off the loop, I began stitching back along the length, simply matching the bead types and colors in each section.  I stitched through the larger accent beads, and through my focal stone bead (isn't it pretty in this picture?)


Finishing this Row

Finishing first row of peyote stitch, freeform bracelet tutorial by Karen Williams, copyright 2013

Here's the bracelet as I finished this first row of peyote stitch.  Again, I simply matched bead types and colors, and stitched through the larger beads.


Turning around

Starting Row 4, freeform bracelet tutorial by Karen Williams, copyright 2013

A quick view of the turn around.  In the last pass, I added beads along the top edge, now I'll add them along the bottom, working in a circular fashion around my center line.  Working both edges; first one, then the other helps keep the piece balanced and my focal bead centered.


The Next Couple of Rows

Rows 4 and 5, freeform bracelet tutorial by Karen Williams, copyright 2013

Next, I start moving colors just the slightest bit, like the size 11 seed beads just starting to encroach on the size 6s on the left hand side of my bracelet.  Note that I used two size 11s to span the space of one size 6 to keep everything laying smoothly.

I also added bridges working around the smaller accent beads.  And I peyote stitched around the bead loop.  The right hand side of the bracelet has six rows of peyote stitch in the photo above.  Then I ran out of beading thread, so I wove both thread ends into the body of my work (removing the stop bead from my starting end) and took the picture.

Rows 5, 6 & 7, freeform bracelet tutorial by Karen Williams, copyright 2013

Between the previous picture and the one above, I focused most of my attention on the left hand side of the bracelet.

     Continuing to build my initial blocks color, I dragged one color into the next over several rows.  This is my preferred method of changing colors as I think it gives a more natural, organic flow to the piece, but that's totally an aesthetic choice.  If you like hard edges between color blocks, go for it.  (That style often reminds me of Gee's Bend quilts).

    Middle left, I introduced a new block of cream as a shorter bridge around an accent bead, then used it as part of the longer bridge around the top edge of my focal, changing to antique bronze a third of the way.  I also turned the inner right bridge into a twist, anchoring the twist in place by stitching along the new edge. 

     And in the lower left I added a bridge of blue matte seed beads and one of the dyed shell accent beads. 

    At this point, the initial color blocks are well established, and it's simply time to continue building along both the top and bottom edge.


My plan is to continue this show and tell next week, with additional pictures of how this bracelet develops.  I'd love to hear what you think - was this useful?

Tuesday, February 12, 2013

Working on Samples for Fall Classes

Moonlight and Shadows freeform beaded necklace & supplies for another
Last week I visited Fusion Beads to discuss class ideas for Fall 2013 and pick up supplies for new samples.   I brought along my Moonlight and Shadows necklace as a jumping off point for the design discussions.

Mel liked the idea, and she and I had a great time selecting a color scheme and components.  We settled on sort of a fall frost color scheme working with a deep ultramarine blue, silver and champagne seed beads, Swarovski crystals and antique copper accents, including a beautiful copper focal in place of Jeannie Dukic's lovely Gin Blossom in my new design.

The process reminded me of the Bead Soup Party in that I wasn't the only one making design decisions regarding my 'ingredients', but rather working with Mel to come up with the right mix.

Think this may be my next project, now that I have every thing all nice and picked out. 


Saturday, February 9, 2013

Focus on Life 6/52 - Feel the Love

This week's challenge, Feel the Love,  nearly stymied me.  It was forefront in my mind Thursday as I hopped onto a bus while running errands downtown.  The bus was strangly full, with several adults just standing in the aisle, looking at the back door as if they planned to exit, but not moving. 


Confused, I glanced out the window just in time to see a child burst from the bus in an explosion of color and fly across the sidewalk to the wall, where he hopped up onto a bench next to his friends.  As I watched a line of children slowly appeared - one at a time bursting from the bus at weighted intervals (their little legs having to climb down the steep bus stairs).  Each was invisible to me until they lit on the sidewalk outside.  Each flying to the wall to join their companions as if drawn by some natural law. 

This has to be one of the grayest bus stops in the city, but not on Thursday.  On Thursday six brightly colored children filled the bench that on a normal day barely seems to accommodate two adults, the fifth boy drawing the sixth into his lap, while the girls lined up alongside, shoulder to shoulder.  I knew I had to snap a picture.   I caught this as the bus started to pull away. 
 
That same stop a day later - grey, isn't it?

 
So that's my entry. 
 
Thanks for stopping by!  Now go on by Sally Russick's blog and check out what the others found for feel the love.


Monday, February 4, 2013

Sea Grass Pendant and Necklace with Cultured Sea Glass Beads

Sea Grass pendant, freeform beaded fringe by Karen Williams

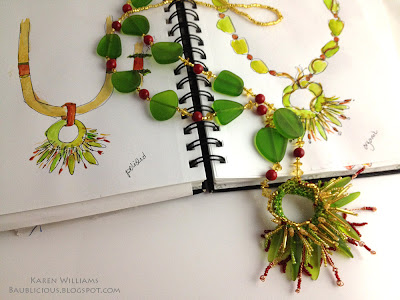
Last week I shared a process photo of my Sea Grass pendant in this post.  The fringe is nice and stiff and sticks out in an arch around the lower half of the beaded circle.  I was inspired by the wonderful cultured sea glass shards sent to me by ZnetShows (it's been fun watching them set up their booth at Tuscon) and a photo of Button Sedge from the book Archipelageo: Portraits of Life in the World's Most Remote Island Sanctuary

Fimbristylis cymosa, Button Sedge or Mauʻu ʻakiʻaki

Once I finished the pendant, I broke out my sketchbook and started playing with different ideas to turn it into a necklace.  Did I want a polished look with a beaded rope, or a more organic finish working with more of ZnetShow's sea glass beads?

two design sketches for Sea Grass, freeform beaded necklace by Karen Williams

I decided to stick with a more organic design.  Originally in my sketch, I'd envisioned some additional lines of freeform beading snaking up along and around the sea glass, but decided I liked the cleaner lines.  Here's the finished piece:

Sea Grass, freeform beaded necklace by Karen Williams


I added some dyed red stones as accents, echoing the deep red seed beads in the fringed pendant. 

Friday, February 1, 2013

Focus on Life (5/52) - Flower Socks

Way back when, when we were newly married, young and very poor, my husband surprised me with a pair of socks.  He explained he'd thought of buying me flowers.  But he knew how cold I'd been, trying to adjust to a Missouri winter.  So he splurged on a pair of fancy knitted wool socks instead. 

They became known as my 'Flower Socks' and every time I wore them we both smiled.  One of those lovely inside jokes. 

Fast forward to this week and Sally Russick's latest Focus on Life challenge: to find and photograph hearts in our every day lives.  Specifically, Capture our Hearts.

I immediately thought of those Flower Socks, still tucked away in the back of my drawer.  They've been joined by lots of other fun socks over the years: quirky socks, bright bold oh-my-gosh socks and of course, cuddly warm socks.

Like the pair above, a Christmas gift from Mom last year, photographed with my new (purple) boots.  I went shopping earlier this week hoping to replace my very-worn pair of black lace-up boots and brought these home instead.  A definite splurge since I still need new black boots.  But how could I resist!?  'I could always return them' I assured myself.  Which was a lie, because I knew when Joe saw them he'd smile and say I should definitely keep them. 

another Christmas gift - from two of my best friends - skulls & hearts, aargh!

And yes, my husband does on occasion bring home flowers (but never when they're expected, which is as it should be).