I plan to get technical in this Lessons Learned post. If you're thinking about producing your own self-published book, then I hope this will be useful to you. Otherwise, I'm hoping that it might give you a behind-the-scenes look at the less glamorous side of the process.
I use
InDesign by
Adobe for the layout of all my book projects, including my shorter PDF tutorials. While there are other tools available, I appreciate InDesign's power and versatility. The only limit to what you can produce are one's own capabilities. The good news is, I've found that you can start with a few basic tools, and learn from there as needed to achieve your desired results. I read and watched more than a few internet tutorials over the course of this project!
Creating a New InDesign Document
The New Document Dialog Box:
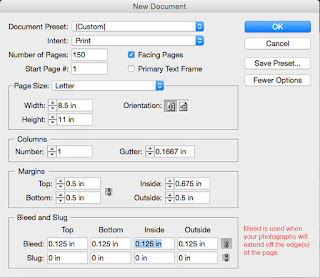 |
| New Document dialog box |
This is the same set-up I used for
Explorations. There are three choices under "Intent": Print, Web, or Digital Publishing. I always choose Print as my default because it requires the highest resolution. It's easier to reduce resolution later for other publication channels than to increase it.
I started with 150 pages, which was my initial page-count goal. it's easy enough to add pages later. I've heard it suggested that you break your document into smaller files so that it doesn't 'bog down' as you work. I kept mine as one document, but this likely depends upon your individual setup.
Note that the inside margin is larger than the top, bottom or outside. This is to prevent the book's contents from disappearing into the ditch of the binding. Because I planned to have some of my images bleed off the edges of the page, I added a bleed margin. Making sure that each image extends at least .125 inches off the edge leaves room for trimming errors at the printers.
When I click okay, my new, blank document appears:
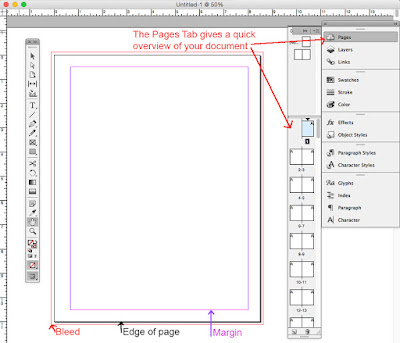 |
| The blank document, with a toolbar to the left and control panels to the right |
I've opened the Pages control panel at top right to show a quick overview of my document's pages. At the bottom of the image, I've noted the bleed, page and margin guidelines.
Setting up Page Masters
Next, I recommend setting up Page Masters. You can use Masters to create uniform layout grids and add page numbers or any other information that you wish to repeat over multiple pages. For
Explorations, I created separate masters for Chapter Heads, as well as One, Two and Three-Column layouts. I also used the masters to display the page numbers.
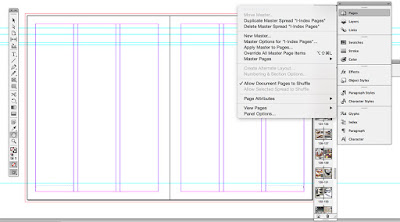 |
| Setting up a 3-column master, and the Pages dialog box |
If you look closely at this screenshot of a two-page/three-column Master from the final file for
Explorations, you'll see thumbnails of the populated pages from the book. As you add information to each page, it will show up in the thumbnails.
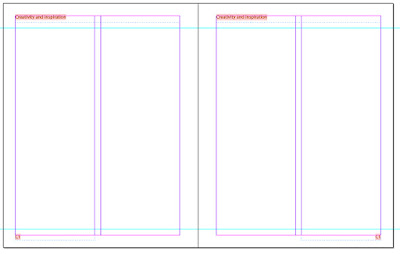 |
| A master from my first book. Each chapter title appeared on its pages. |
With my first book, I also used masters to list the chapters' titles on each page within the chapter. The chapter titles are outlined in orange in the screenshot because I don't have the font I originally used on this computer. One of those unfortunate quirks from having to purchase a new computer when the old one dies - always a few things that didn't transfer over. But InDesign tells me which font I used, so I can purchase a new license, should I so choose.
Building Font and Paragraph Styles
Now that I have my Page Masters set up, it's time to set up my Font and Paragraph Styles. I touched on this in my last
Lessons Learned post. Before I began active work on the page layouts, I put together a cheat sheet of all
of the font styles and colors I planned to use. To make it easier to
reference, I stored the info as a separate Master in my InDesign file.
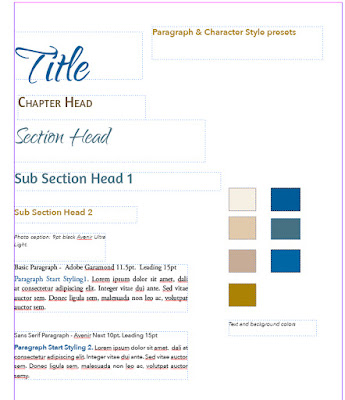 |
| A reference 'cheat' sheet for the book's font styles and colors |
Then it's time to actually set up the Paragraph Styles by specifying the font, size, leading, color and more for each of your text blocks.
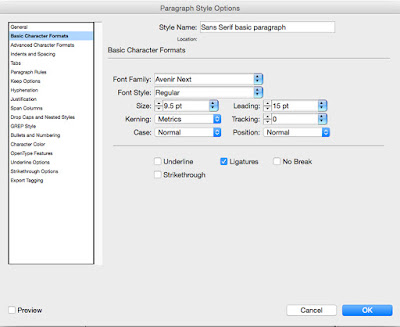 |
| The left-hand menu allows you to fully customize each Paragraph Style |
I set up separate styles for each level of text: Titles, Chapter Heads, Section Heads, Body Text, etc.
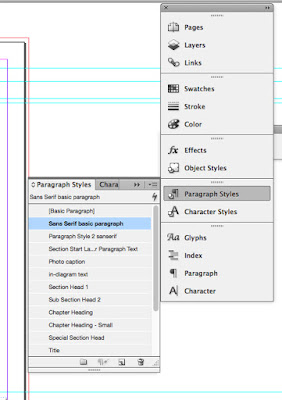 |
The Paragraph Styles Control Panel with my presets |
Once you set up each of your Paragraph Styles, the control panel let's you easily format blocks of text. Simply select the text you want, then click on the style you want. Your text is instantly styled with your presets. It takes time to set up all of the paragraph styles - I spent the better part of two days tweaking things to make sure I had what I needed. But speaking from experience, they can literally save you days and weeks worth of time once you start working on the page layout!
Ready to Rock
Whew! At long last, after nine Lessons Learned posts, we are finally at a point where I can start talking about page layout in the next post. I'll share my iterative process and how I work to put all the pieces together into a cohesive whole, at least when all goes right! Thanks for joining me on the recap of this journey.
Have any questions about masters or paragraph styles? Let me know!


