Studio Musings

Tuesday, November 26, 2013

Upcoming Craft Shows - Friends and Friends of Friends

While I don't do craft shows myself, beading kits having a pretty narrow audience, I love supporting other artists and artisans that do. It seems that quite a few of my friends are in Craft Shows over the next few weeks, so I thought I'd give the a shout out to at least a few:

Etsy Rain Handmade Holiday Show
Some of the vendors from last year's EtsyRain show

November 29-30th, 11:00-5:00 
Elliot Hll at Pier 66 
Inside the Bell Street Cruise Terminal

Now this one is a BIG show, with over ninety artists and artisans, all members of our local Etsy group.  I will likely be volunteering there on Saturday, so if you plan on stopping by let me know and I'll try and hook up to say hi!

And as a bonus, you can go for a beautiful stroll along the waterfront while you're there.


The Pacific Northwest Needle Arts Guild 
Critters from the 2011 PNNAG holiday sale
December 6-7 from 10am - 4pm
4649 Sunnyside Avenue North, Room 120, Seattle, WA 98103

PNNAG is having a holiday craft fair at their office in the Good Shepherd Center. This is a smaller sale, focused almost entirely on needlecrafts (sewing, knitting, crochet, cross stitch, dolls and stuffed animals and yes, beading). Members donate their work with all proceeds going to support the organization though the coming year. This sale is small, but it is mighty and I have come away with some truly awesome holiday gifts in the past. (Note their sales are on Fridays and Saturdays, not Sundays). 


Two of my friends from Seedbeaders will also be in upcoming shows:

Eileen Nelson will be part of a two-person show at the Al Dogget Studio December 7-8 from 10:00am-5:00pm.

Octopus pendant by Tamera Mickleson
Tamera Mickelson, who creates fabulous Steampunk/Goth/Victorian inspired jewelry ( I wrote about her and her 'Victorian Listening Device' pendant in this post) has a whole host of shows lined up, here are just three:


Saturday Dec 7th and Sun Dec 8th
Phinney Community Center

Saturday, December 14th
Gig Harbor Boys & Girls Club

Saturday, December 21st - 12pm - 5pm
Columbia City,

Craft Show in Your Pajamas
And lastly, one of my favorites; Sarah over at Saturday Sequins will be hosting her second annual Craft Show in Your Pajamas on her blog.  She rounds up a fun mix of artists, artisans, authors and other interesting folks making interesting things.   Always worth a look see. 

So there it is.  Just a few of the Craft shows I know of happening in the Greater Seattle Area, and one online in the Blogsphere where anyone, anywhere can enjoy it.  Now I'm back to my own Etsy endeavors....

And to all of my friends who ARE doing craft shows this holiday season - all my best to you!  Hope the customers come knocking down your doors (but not your booths)!  :)

Saturday, November 16, 2013

Captured Treasures Blog Hop: Incorporating Found Objects Freeform Peyote Challenge and Blog Hop

Quite the long title, but today is the reveal for the long-awaited Freeform Peyote Found Objects Challenge.  Many thanks to everyone participating in the challenge - it's you that makes it a success.

This time around I've tackled a much larger project, which you may have heard me talk about. I'm doing a beaded bottle that's supposed to look like it's just been dragged out of the ocean.

I always tell challenge participants that their work doesn't need to be totally complete: they can share in-process pieces as well.  That's very much the case with my piece.  As you can see from the photo its very much in process.  I took these photos Thursday night after dark.   I'd hoped to take more photos today, but that didn't work out at all.  

My plan is to totally encrust this bottle with freeform peyote, shells, rocks, sea glass and other treasures collected from beaches in Hawaii, the Bahamas and Carribean, and closer to home here in the Pacific Northwest encompassing about ten years worth of travels.

It looks a little more finished from this angle
As a side project, I'm trying to fill it with messages (Messages in a Bottle) from as many people as possible. So if you'd like to write a message for my bottle, here's your special invitation!  I'd love for it to be filled with stories, quotes, prayers, affirmations and wishes, real or imaginary.  Many thanks to everyone who has already sent me messages for my bottle!

I promise to post more photos as this project progresses.

Now here's the full list of participants, many of them members of our intrepid Freeform Peyote Beading Facebook Group:


the bottle with some of the pieces I plan to add


Lisa Jones - Into the Deep

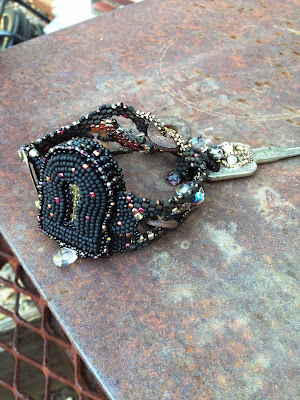
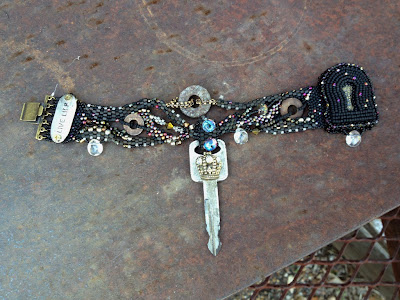
Into the Deep by Lisa Jones
Two of the artists in our Freeform Peyote Challenge don't currently have their own blogs, so I'm hosting them here as guest posts.  Here's Lisa Jones talking about her freeform peyote design:

I actually had a few found objects to choose from:  the big key found in the front yard, a small apothecary type of bottle found in the back yard and several old, rusty washers that I’ve been collecting from the front parking lot where I work.  I knew I’d used them sometime, as they have a great patina!  

The key kept grabbing my attention, so I definitely wanted to use it in my piece.  Keys are so symbolic and a myriad of ideas came to mind while thinking about it.  I began thinking about how our minds work, the conscious, the subconscious and the mysteries that lurk there, waiting to be discovered.  This led to the idea of the lock “box” clasp.  The color scheme sort of naturally came together as a result of my thought processes and the items being used.

The whole bracelet is symbolic, really, from black matte beads representing the mysteries of the deep subconscious to the quartz crystal drops, which represent moments of enlightenment.  I thought of the old, rusty washers as representative of the how our minds can become entangled (going in circles) in old, rusty thoughts which no longer serve us.  Red, to me, represents adventure, love, and stepping out into the unknown.  Gold and silver are the fun of life, the joie de vivre, lightness – AKA “The Good Stuff”.    The idea of the box clasp is seen as a vessel of sorts, sort of like our physical brain, housing our thoughts, dreams, hopes, memories, worries, fears and our neuroses.

full view, Into the Deep by Lisa Jones
At the outset, I wasn’t sure if the box clasp would work.  So I embroidered the lock first to see if I even liked it.  I do like it, but in the future, I would use size 15 beads, or charlottes to get a tighter embroider.  My 11’s look a little disheveled, so I would definitely do that differently.  The clasp does work well, although time will tell if it holds up.  It is a bit of an experiment.  Overall, I am pleased with the bracelet!  So much, I am currently working on a freeform necklace to coordinate with it!  I have had a really fun time working on this project and will most definitely work in freeform peyote again. 

Now take a moment to visit the other participants.  The full list is available here.

Regina Roper and Amelia Island Reliquary

Two of the artists in our Freeform Peyote Challenge don't currently have their own blogs, so I'm hosting them here as guest posts.  Here's Regina Roper talking about her two of her freeform peyote designs:

Amelia Island Reliquary by Regina Roper
AMELIA ISLAND RELIQUARY

I have lived on the ocean almost all of my life. If I wasn't right on the water, I've almost never lived more than 45 minutes away. I have also been a collector of stones and fossils for most of my life, so it isn't really a surprise that a lot of the jewelry I make has an ocean theme. Over the past 21 years, I have walked many beaches here in Florida, collecting fossils. But the place I usually go is a lovely little barrier island nearby called Amelia Island. The most common fossil we find are shark's teeth. I have jars full of the teeth of all possible sizes and species of prehistoric shark. I even have a few rare ones.

When I was thinking of this challenge, I knew I wanted to do an ocean-themed piece, so I chose to weave ten beautiful fossil shark's teeth into the body of my necklace, and drop an extra-special large specimen of a Whaler-shark (a large ocean going shark) at the bottom. I chose my color scheme of black and deep blue to reflect the mystery of the primal ocean.

100% of the seed beads used in this project are antique faceted 'charlotte-type' beads that were made c1900. The peyote weave is embellished with faceted crystal beads, bicones, cubes, drops and other things. When weaving the teeth into the piece, I knew that they wouldn't just 'stay put' unless they were totally encrusted (and thus completely hidden) by beads. What would be the point if you could not see them and know what they were? So I decided to hand wrap each smaller tooth with black Artistic Wire specially embellished on the shank with beads, and blend the wire wrapped teeth into the freeform peyote. That way they were 100% secure, and their detail could show. The larger tooth, I was able to drill and wrap minimally to hang as a drop. I am very pleased with the way 'Amelia Island Reliquary' turned out, and I have received many compliments on it.


Manawydan's Blessings by Regina Roper

MANAWYDAN'S BLESSINGS

I will keep using the freeform peyote weave technique. I actually use it a lot in making custom chains for my bead embroidery pieces. Bead embroidery is my first love, and I am always looking for new ways to make my work more interesting. I used extensive freeform peyote on the chain for a very large breastplate that I made about a year or so ago. Another ocean themed piece, this one incorporates a large fossil sand dollar, turitella fossil agate, agatized coral, opalized ammonites and fossil shark's teeth along with contemporary seashells and freshwater pearls. It is called 'Manawydan's Blessings'. Manawydan fab Llyr is the Welsh god of the sea, and all of the things used in the piece symbolize his gifts.

I would have loved to use this piece for my challenge entry, but in honesty, I did not actually find all of the components myself, so it did not meet the criteria.  This piece was recently awarded, winning second place in a local judged fine art show in the 3D/Mixed Media category.

Now take a moment to visit the other participants.  The full list is available here.

Friday, November 15, 2013

Looking for the Captured Treasures Blog Hop?

Looking for the Captured Treasures Blog Hop?  


It's been postponed by one day, so be sure to check back tomorrow, Saturday November 16th (Despite what the badge says) to see what everyone created working with this theme. 

Wednesday, November 13, 2013

Kit Making - What format should I offer the instrutions?

I've been busy with a new round of kit making, filling in gaps where inventory has run low and putting together some new kits as well (some already available on my Etsy shop and some of which should go live within the next week or so).  As part of this, I've revisited the issue of the format of the included instructions.  Specifically - should I continue providing the instructions as printed pages, or should I move to a digital format - either as an included CD or as a digital download. 

As part of this process, I put together a Pro and Con list for each of the three format, trying to look at things from both my and my potential purchasers perspectives.  Here's what I came up with:

Paper Copies
Pros

  • The kit is immediately complete, without need for further work on students part
  • No need to have computer/internet access
  • Hardest to reproduce - though not by much
Cons
  • Weighs more - increases shipping rates, especially for international packages
  • Bulky - especially in the case of my fish tutorial, which is 24 pages long
  • Costs more - ink costs keep going up, and I have to pass those increases along in my kit prices. (I spend nearly as much on ink in a year as I do on beads).
  • The instructions are printed on my inkjet printer, so if they get wet, the ink will likely run

CDs
Pros
  • Instructions are part of the kit
  • Purchasers can print multiple copies for their personal use if first copy is damaged
  • Purchasers may also load the file onto their digital devices (tablets, iPads) if they like
Cons
  • Many newer machines don’t have CD drives - could make it difficult for some purchasers
  • CDs are fragile, and could be damaged/broken in shipping
  • Ease of printing multiple copies makes it tempting to print extra copies for friends
  • To make them look nice, I’d have to print CD labels - one more layer of complication

Digital Downloads
Pros
  • I already offer a number of my tutorials as digital downloads - people seem comfortable with the format
  • Purchasers will likely have the instructions well before their physical package arrives
  • Purchasers can print multiple copies for their personal use if first copy is damaged
  • Purchasers may also load the file onto their digital devices (tablets, iPads) if they like
  • Purchasers may access the download from anywhere with an internet connection
  • No printing or CD costs
  • More and more people are comfortable with digital formats
Cons
  • Instructions not an immediate part of the kit - Purchasers must take an extra action to access instructions
  • Students must have an Internet connection to download instructions (but if they purchased my kit through Etsy, then they obviously do)
  • Ease of printing multiple copies makes it tempting to print extra copies for friends
  • Etsy doesn't have a built-in system for dealing with digital content as part of a physical sale, so I will have to email the download code to the purchaser, instead of allowing Etsy to provide it.

There are definite pros and cons for each format.  After way too much thought, I've decided I'm leaning toward digital downloads.  I think it's a clean, streamlined approach.  Personally, I like having my tutorials on my iPad - it's far more convenient for me than having to keep track of lots of pieces of paper, especially when I'm working out in my garden and there's a breeze.  For the download, I will email the Purchaser within 24 hours (48 hours over weekends) with the download code and will also include download instructions inside the kit itself.

But, I'm moving slowly.  So, through the end of the year if you purchase one of my older kits for which I've already printed instructions, you will receive a printed copy.  Unless it adversely affects shipping costs (such as in international packages) in which case I will send you a digital download code instead.  For newly minted kits, you will receive a download code for the instructions.  The instructions will be in PDF format. 

And, as a fail safe during this transition, if you have a preference as to which format your instructions come in - printed or digital download - let me know.  Send me a note with your purchase and I will make sure you receive whichever you prefer.

So that's where my thoughts are at present, but I'm curious if you have any preferences, one way or the other?  Let me know!  While I make the kits, I make them for people like you and your feedback helps me stay on track.  

Saturday, November 9, 2013

Paper Dyeing - an Explosion of Color

I'm in another one of those stages right now where I can't yet share any of current bead work, so I thought I'd share a little side project - dyeing paper.

Why dye paper?  Well, originally I used it in my design work.  Now, I mostly use it to wrap my Etsy packages.  But more than that, I dye paper because I love the chance to play with color in such a direct fashion.  Using the resulting papers for wrapping is a lovely way to use the papers so that I can dye more down the road without burrying my studio in the stuff.  :)

So, here we go:

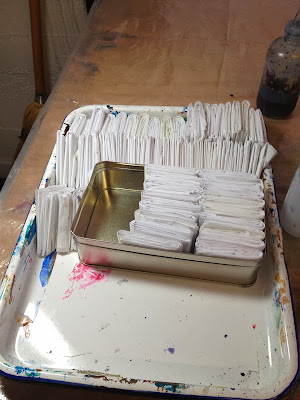
Tray of folded papers
I fold a dozen or so papers a day until my tray is full

My dye bottles and messy dye workspace
My dye workspace mid process - even the cleanup paper towels end up pretty

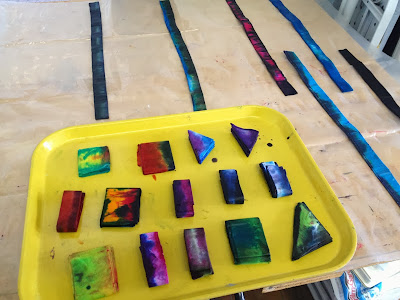
an old cafeteria tray filled with a dozen or so folded and dyed papers
I dye the folded papers one at a time and place them on my cafeteria tray

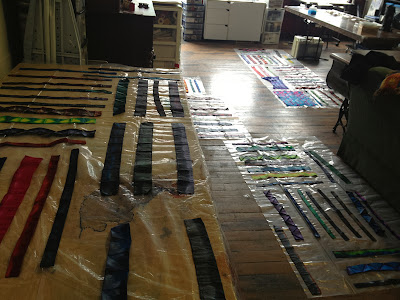
placing folded, dyed papers on plastic throughout my studio to dry
Then move them to plastic and open them up a little to dry - my studio is awash in plastic!

a leak in my glove dyes my thumb a deep purply blue
turns out there was a leak in one of my gloves. 

After scrubbing.  The dye really shows up the damage from my beading needle

bundles of folded, dryed paper remind me of streamers of color
Time to unfold the dried papers - I gather them in bundles first like streamers of color

the fluffy stack of unfolded, dyed papers
I stack the unfolded papers to await ironing
ironing the papers
Then it's time to iron each sheet of paper - one by one

the ironing makes the designs more visible


Ironed papers
Stacking the dyed papers on my main work table

side view of paper roll shows of the colors
I had to roll one of the stacks because I love this cross section shot

dyed papers spread on my worktable.
some of the papers fanned out on my work table.  I dyed 102 sheet in total

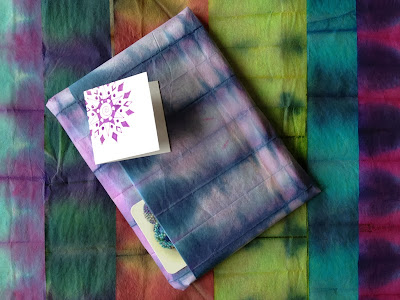
wrapped Etsy package
My first Etsy package wrapped using my newly dyed papers -with one of my little cards

So there it is!  Several days and weeks worth of intermittent work in a series of fifteen photos.

Right now I wrap all of the items from each Etsy purchase up together as they fit better that way in the packing envelope.  But going into the holiday season, I will offer to wrap them individually, and include blank versions of my little gift cards (right now the cards are little thank you notes from me).


Monday, November 4, 2013

NW Bead Society Bead Retreat

Time truly does fly by this time of year!  I can't believe it's already been a week since I returned from the wonderful Bead Retreat on Vashon Island.  I'd meant to write about it the Monday I returned.  Oops!  I didn't even have time to download all the photos until last Thursday.

The NW Bead Society's retreat is sort of like WWDC in that it sells out almost as soon as it's announced, with many returning year after year.  I was a little slow off the bat, and spent much of the summer on the waiting list, but finally got the call that someone had backed out so I was in.

So bright and early on the last Friday in October, Patricia Hardway and Pamm Horbit grabbed me and we all headed for the Fauntleroy Ferry.  There's something magical about ferries - I always feel like I'm on vacation as soon as I'm onboard.  Despite the fact that it's really right next door, I'd never been to Vashon Island, an oversight I was very happy to rectify.  It's amazing to me how close it is to Seattle, because it truly felt like a world away. 

a quick snapshot of the main beading room taken from my little corner
Then there was the retreat itself, held at the Retreat Center at Camp Burton, a wooded, waterfront property with gorgeous views.  Our main room was quite spacious, with a little kitchenette area and good light.  I managed to grab a corner spot with windows on either side.  Besides lots of time for beading, it was such fun to simply spend time with the other attendees.  Time to really talk with women I'd known casually for a couple of years now.  And to meet new people - like Sally Anaya, who teaches basket weaving around the world and maintains a blog that she updates daily.  Daily entries - I am so impressed. 

And when I needed a break from stitching, there was always someone up for a walk around the camp or a foray down to the beach (where my friends helped me find several more items for my Found Objects challenge piece).  Meals were served in the main dining hall, a short walk away, with a spectacular view.  For a day and a half we shared our meals with the Ballard High School Choir, who gave us a mini-concert Saturday night, singing Ave Maria.  Which of course made me think of my Mom because that's one of her favorite songs.  The food was simple, healthy and absolutely yummy and it was sooo nice letting someone else worry about menus and prep and cleanup, too.

view from the dining room at Camp Burton

the same view from just outside on the deck
from one of my walks

But perhaps one of my favorite things about the weekend were the Secret Bead Buddies.  Everyone was incredibly sneaky, and it was such fun returning from a short walk to find a package sitting at my workspace, or a package waiting outside your bedroom door in the morning.  It was equally fun trying to find ways to sneak my packages to my Buddy and helping others do the same.  And even more fun watching everyone discover the surprises.
 

I didn't find out until the last morning, but my Secret Buddy, Sharon,  couldn't be there.  But she gave all of her packages to Shirley with explicit instructions.  Shirley did an amazing job - she was definitely sneaky extraordinare.  I found my first surprise waiting on my workspace Friday evening with a hand-written note saying "Do Not Bend".  It turned out to be this mask. 


I spent most of my weekend working on bits and pieces for my Beaded Bottle project.  And collected several new messages for my project.  (To recap - I'm working on a Message in a bottle project and I'm still collecting messages for my bottle.  Feel free to send me one if you're interested). 


Sunday I took a fun class from Debby Zook on making Icosidodecahedrons (otherwise known as Beaded Baubles).  There was supposed to be a large bead in the center, but mine didn't fit (too small) so all I have is the framework, which supports itself quite nicely.  I'd love to make a bunch of these for my Christmas tree. 

They're also another bead project that you could give to a guy. 


Because I can't resist sharing, here are a few more pictures from the beach:


Tidewater with barnacles

barnacles encrusted on an old stump