Studio Musings

Saturday, December 26, 2015

A Little Box for Boxing Day

Three little boxes - one decorated with a handmade rubber stamp
Here's a cute little box pattern for Boxing Day.  It's made from a single sheet of paper, and I'm thinking that it could be used for gifting handmade jewelry or other little presents.  I like the idea of a handmade little box to complete a handmade gift presentation. 

I designed the box so it slots together with tabs, so no glue is required for assembly.  For the smaller white boxes, I simply used white index paper that I buy by the ream at my local office supply store. 


My notes as I played with ideas for the design
One of my Christmas gifts this year was a Cricut Explore Air cutting machine.  While it was ostensibly a Christmas gift, Joe gave it to me a little before Thanksgiving so I could play with it heading into the holidays.  The Cricut is designed to cut paper, card stock, vinyl, even fabric, felt and leather.  You can work with the designs in their library, or create your own. 

I'm just starting to explore the possibilities.   My machine came with a short, free subscription to their design library, so I've mostly played with their images and projects, seeing how you can combine and modify them to become familiar with the software.  This box is my first truly 'solo' design.


The template works with an 8 1/2 x 11" sheet of card stock

Here's the pattern template ready to be cut.  I saved the image full size so you should be able to click on it to get a larger version.  It's designed to fit a regular 8 1/2" x 11" sheet of card stock, and could be cut out using an Xacto knife or scissors.   And if you have a Cricut cutter, here's a link to the project file - feel free to use it as you wish!  You can easily resize the design using the Cricut software. 

I made the larger red box by scaling the pattern up to use a 12 x 12" sheet of card stock. 


Friday, December 25, 2015

Mystery Christmas Present

Late yesterday evening, a last package showed up at our doorstep.  A padded manila envelope, clearly addressed to me - totally mystified, I opened it.  Inside I found this fun, fun turtle cookie cutter enclosed in a ziploc baggie.  No note, nothing to indicate who it was from. 

Just a mystery Honu, who somehow washed up on the shores of chilly Seattle instead of sunny Hawaii. 


Since I happened to have sugar cookie made up and ready to roll, I put him right to work today! Then I decided he needed a couple of friends to make him feel more at home. 


My cookie decorating skills are about on par with a child playing with finger paints.  They will NEVER win any awards, but they sure are fun!  I do like the rooster - I think he is definitely my 'best decorated'. 


Joe snapped this one of my Santa Turtle.  So, to whomever sent me the turtle - thank you!  He sure is fun.

And Merry Christmas to all of my friends who celebrate the day.  Here's hoping for a day filled with light, love and laughter. 

-Karen


Sunday, December 20, 2015

Holiday Ornament Swap and Blog Hop

Just over a month ago, I sent out an invitation to participate in my first annual Ornament Exchange and Blog Hop.  Time has truly flown by and today is the day for the Blog Hop Reveal!

We had a small, but mighty group:


After I paired each participant with a swap partner, it was then up to them to exchange emails and handmade ornaments.  My only 'rule' for participation was that the ornaments had to be handmade by each participant and had to include at least one bead in the design.

 Thank you all for joining in for this bit of holiday cheer!  Liz and Becky don't currently have blogs of their own, so they sent me photos to share in a separate post here.  From my perspective, I love how these swaps allow me to get to know other beaders and artists from around the country a little better. 

I'm afraid the package that Carrie sent to me seems to have been temporarily lost in the mail.  It was coming from Hawaii, so maybe it decided to spend an extra day, or maybe a week or two hanging out at the beach before making it's way to oh-so-rainy Seattle.  Can't really say that I'd blame it!   Even still, it's been fun getting to know Carrie better as we exchanged emails regarding our holiday traditions and favorites.

While Carrie enjoys many of the more 'traditional' holiday themes, she admitted that since she's lived in Hawaii, she's "grown to be a fan of the local Christmas themes such as volcanoes, seahorses, hono (sea turtles), pineapples, monstera leaves, petroglyphs, palm trees, coral, jellyfish, starfish and reef fish".  Reading that, my original plan to send her a more traditional holiday ornament began to morph.

She also mentioned that her favorite color is the new Toho 2600F "Lemongrass", followed by "lime greens, teals, orange, orange-reds, periwinkles".  She continued "pretty much I love all the greens - especially olives and limes, oranges. Bronze/Browns/Coppers/Silver - all good."

So not necessarily the normal Christmas colors.  Can you guess where this is going?  Yep, I decided to make her an ornament in my Happy Fish series.  Because it was going to be a Christmas ornament, I decided to work with an ogee pattern for the scales.  What could be more ornament-shaped, right?

Here's what I finally came up with:


Happy Fish ornament in oranges and greens with rasberry and bronze accents.
My newest Happy Fish, all decked out in her holiday splendor

I wrapped the little fish up in a hand-painted box, then added a couple of other things to the shipping box, including some of my biscotti and a little paper ornament I made.

A peek inside the package before I closed the lid
I haven't heard yet what Carrie thought about my unorthodox creation.  I'm truly hoping she liked it.  In the meantime, I know that I had an absolute blast stitching my newest Fish friend.

Now, be sure to check out everyone else's ornaments, and I promise to post Carrie's as soon as it arrives.


Ornament Swap Partners Becky Clay and Liz Hart


Liz took this photo of the package she sent to Becky
Becky Clay and Liz Hart were definitely on the same wavelength with their ornament exchange, despite some initial difficulties in connecting via email which left very little time to stitch.  Both choose to use Sandra Halfpenny's Snowflake patterns.

Liz started making snowflakes from Sandra's designs, then started playing.  The white one is  Sandra's Snowflakes Falling. She mentioned that the pattern is available on Sandra's blog as a Christmas gift to her readers.  The other two designs Liz sent were hers; same design with different beads.

Becky's icicle was a free icicle pattern she picked up from  TheBeadsKnees that isn't currently available, unfortunately.


Becky's photo of the Snowflakes she sent to Liz

Becky's icicle, along with a closeup to try to show the beading. 

Not all of Liz's snowflake experiments went according to plan, as she shares in this process photo.  Oops!
List sent along the photo above with the note "You'll get a kick out of this process pic - it seems my fingers and brain weren't connecting very well!"

And here's one last photo from Liz of the snowflakes she stitched for Becky.  Lovely!

Sandra Halfpenny's Snowflake Falling and Liz's continued experiments

To see what everyone else made and received, check out the list below:

Friday, December 18, 2015

Let it Snow this Sunday at Fusion Beads

I love the soft, vintage colors of this 7-pointed star ornament
Looking at the ten-day forecast for Seattle, it's looking far more likely that we'll have a Wet, rather than a White Christmas.  But no matter! There will be snow flurries a plenty this Sunday at Fusion Beads, where I'll be teaching my third-annual Snowflakes and Stars workshop. 

Happen to be in Seattle this weekend? 
Whether you need a quick last-minute gift or simply want to treat yourself, consider joining me for an afternoon of some holiday beading fun. 

Not in town?  My Snowflake and Stars tutorial is available through my Etsy Store as a PDF download.  It's also not too late to claim your free copy of my Snowflake Chains holiday special.  I've extended the offer through January 2nd, 2016.  

Monday, December 14, 2015

Snowflake Chains - Update for my Snowflake & Stars Tutorial

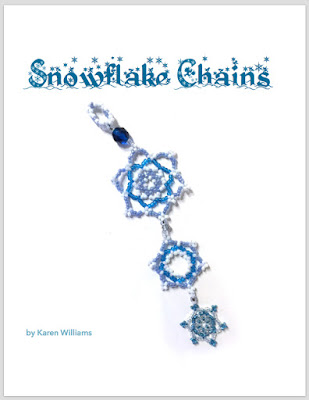
The cover page for Karen Williams' Snowflake Chains tutorial featuring a three-tiered snowflake ornament
Cover page for Snowflake Chains special update
Snowflake Chains, I like to think of them as the Daisy Chains of Winter.  Most of the snowflakes I create are stand-alone, solitary individuals.  But sometimes, I want a spill of snowflakes.  That's when I start making snowflake chains.

I spent last week writing up the instructions for how to make these chains as a special update for my Snowflakes and Stars tutorial, my original PDF tutorial.  It's still one of my favorites because it offers so many possibilities.  Like real snowflakes, there's infinite ways to vary the basic patterns to create new designs.  It's a pattern I tend to revisit every year as the holidays approach.

This latest update includes a quick review of basic snowflake construction, then shows how I made the second and third stars in the line.


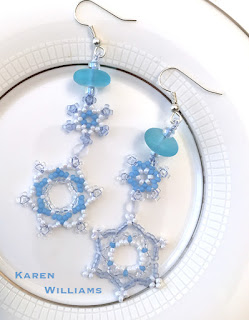
each earring features two linked snowflakes, topped with a cultured sea glass bead.
Earrings made with Snowflake Chains
If you already own a copy of my basic tutorial here's what you need to do to claim your FREE copy of this update:
  1. Sign up for my mailing list (if you're already on my mailing list, then you're a step ahead)
  2. Let me know where you purchased a copy of the original tutorial (this also includes snowflake kits and in-person workshops). 
  3. Bonus: Send me a photo of one of the snowflakes you made using this tutorial.  This last isn't strictly necessary, but I think it would be fun to put together a blog post showcasing everyone's snowflakes. 
Otherwise, you can claim your free copy of this special update when you purchase a copy of the base Snowflakes and Stars tutorial from my Etsy store.
  1. Sign up for my mailing list (if you're already on my mailing list, then you're a step ahead)
  2. Purchase the tutorial on Etsy.  Write "SnowflakeChains" in the notes to seller on Etsy.  Make sure to include your email as well, so I can send you the link to download your special update!
 This offer is good through December 24th, January 2nd, 2016. 


A seven-sided star  - one design made based upon Karen Williams' Snowflakes and Stars tutorial
The base tutorial - Snowflakes & Stars
As I noted in my previous post, I'm trying to simplify my life as a solo, working artist.  It can be so hard to juggle the time necessary to produce and document my work, write my patterns, design the illustrations, and keep up with everything else.  I love what I'm doing, but I have to learn to do it smarter if I want to be able to continue.

At the same time, I am incredibly grateful to my friends and supporters who have helped me continue to work in the field.  Without you, I wouldn't be able to do what I love.  With all of that in mind, I've decided one way to simplify things while also saying thanks to you, my strongest supporters, is to announce updates to my various tutorials via my newsletter.  I'll follow up when I can here on my blog, but the primary source will be my email newsletter.  If you own the original pattern and want the update, my newsletter will include simple (I hope) instructions on how to claim it.  And if my instructions ever seem crazy, just let me know that too!  :0)


Happy Holidays!

Oh, and in case you're interested, I will be teaching my Snowflakes and Stars workshop in person at Fusion Beads in Seattle this Sunday, December 20th from 2:00-5:00pm.  This is the closest to Christmas that I've ever taught this class.  If you're in the area and would like a beady break from last-minute holiday prep, come join me!

To sign up, you'd need to call the store at 206-782-4595.
782.4595#sthash.YxKepKSa.dpuf


Tuesday, December 1, 2015

New PDF Tutorial: Criss-Cross Lantern Beads with Right Angle Weave

Preparing for a workshop early last month, I pulled out the pattern for my Cap Beads from my book Corsets, Caps & Stays: Elegant Beaded Beads.  What would happen, I wondered, if I used some of the fun, shaped beads that have come out since then?  My new Criss-Cross Lantern beads are the result. 

I promised my students that I'd send them the revised instructions, including this variation.  And here it is, nearly a month later!  I've heavily revised the original pattern, doubling the number of detailed bead diagrams and added all-new instructions for the Lantern Bead variation. 

The Lantern Ornaments Beaded Beads PDF pattern is now available in my Etsy store.   To celebrate its release, I'm offering a special deal. 

 
2015 Holiday Special

** If you purchase a copy of my original Corsets, Caps & Stays book (either paperback or digital versions) now through December 15th, I will include the download code for my Lantern Bead PDF tutorial with your purchase. 

** Also, for friends who already own a copy of my original Corsets book and are on my mailing list, my next newsletter update will include instructions for how you can claim your free copy of this new pattern.  

To simplify my life, I've decided to post all free updates via my email newsletter from now on.  There's only one of me and trying to keep track of who purchased what, from where, and when gets to be sooo crazy, especially since I have no way of tracking Amazon sales.   Trying to track everything takes up a tremendous amount of time that I could otherwise use for designing, beading and writing.  From now on, I'll post update opportunities in my email newsletters, along with simple instructions on how to claim your PDF updates for my patterns that you've previously purchased. 

Not on my mailing list?  Click here to sign up.  Normally I send out one to two email updates per month, sometimes a little more, sometimes a little less.  It all depends on what's going on. 

This month, I've decided to get ambitious!  My plan is to send out a special update every Wednesday, starting tomorrow for the next three weeks, with a new pattern addition or update code.  If you already own the base pattern (or purchase it during my promotion), you'll receive the updates for free.   Next week I'll be sending out an addition to my Snowflakes and Stars tutorial.  This is my way of saying thank you for helping to make it possible to do what I do! 


Monday, November 16, 2015

Join me for a Handmade Ornament Swap and Hop

Can you believe we're already into the second half of November?  I woke up this morning and couldn't quite believe it!  Made me realize a couple of things, one of which was that if I wanted to participate in an Ornament Swap this year, then it was high time I did something about it before the opportunity slipped by me entirely.

For the past couple of years, one of my favorite 'signs of the season' has been the Ornament Swap and Blog Hop hosted by Sally Russick.   Sally has moved her blog a couple of times over the past year or so, but as far as I can tell, she's not hosting an ornament exchange this year, at least I didn't see anything on her blog.  It may be that I just didn't make it onto her list this time around.   I hate to miss it, so I decided to jump in and host one myself, hoping there might be others like me who waited a little too long to get in on other opportunities.   Here goes:


To Sign Up:  
Email me, including your name, email address and blog URL.   Or leave a comment with your email address on this post, telling me you'd like to join in. If you don't have a blog but would like to participate, let me know - as long as you can email me photos and text, I'll make sure you're included in the hop.  Sign ups are open through this Saturday, November 21st.

Once I know who's participating, I'll send out emails on Monday the 23rd letting you know who your trading partner is.  You'll then be responsible for trading emails and exchanging postal addresses.  Then it's time to make your ornament!

The Ornaments:
All ornaments must be handmade by you.  And since I'm a beady sort of person, they must include at least one bead.   They do not need to include any seed beads (but they certainly can!)  You simply need to make something you'd love to receive, and then mail it to your trading partner.
All packages must be mailed by Saturday, December 5th.  

Remember to take pictures of your ornament before you send it!  And take pictures of the ornament you receive from your trading partner.  But hold off on posting it online - we'll have a Blog Hop and Reveal on Sunday, December 20th.

Blog Hop and Reveal, Sunday December 20th
On the reveal day, post a photo (or photos) of what you made and the ornament you received.  Include a paragraph or two about both pieces. 

Inspiration
Here's a link to my 2014 post with links to all the participants.  If you look through the participants' posts, you'll see the wide range of designs and materials.  Last year, I was paired with the talented Therese Frank, who stitched the ornaments below.

Star Ornament and needle case stitched by Therese Frank
Besides the lovely star ornament, Therese also sent me a beaded needle case that has traveled with me all year.

And here's a link to my blog post from 2013, featuring the lovely ornament I received from Shirley Moore. 

Shirley Moore's beautiful ornament and card from 2013

Here's hoping you'll join me for a little holiday cheer!   

Tuesday, October 27, 2015

Happy Halloween Pumpkin Rings

Fall is my favorite season.  Halloween runs a close second to Christmas for my favorite holiday, and I absolutely adore the soundtrack to Tim Burton's The Nightmare Before Christmas.  Costumes, magic, a little spookiness, a chance to be someone else for a night?  I'm so there!   So the question wasn't 'do I want to work with a Halloween theme' for my Freeform Peyote Rings workshop at Fusion Beads earlier this month, but rather "what Halloween theme do I want to play with?"

My first thought was Disney villains - a ring for Maleficent or Cruella Deville perhaps? I could see a fiery crimson red jewel for Malificent, while Ms. Deville's would have to be in her iconic monochrome black and white.  Or maybe a witch's ring?  What would I do for that?  Instead, I opted to make myself a pumpkin patch ring.  Jack Skellington might be the Pumpkin King, but I could wear a Pumpkin Ring!  A magic pumpkin ring, wouldn't that be fun?  I'm sure I need a magic pumpkin ring. 


Ring #1 with a Carnelian focal
I ended up making two rings.  The first is a little more subdued, with a 15mm round carnelian stone that doesn't immediately scream 'pumpkin', but definitely plays to the autumnal theme with its muted color tones.  The little pressed-glass flower reminded me of pumpkin blossoms, so I decided to add it, but liked the violet color better than yellow.  So now I have a purple pumpkin blossom.  Let's hear it for creative license.

It also let me demonstrate the stages of work when adding the focal bead from the very beginning.


Perusing Fusion Bead's selections before class, I came across these fantastic orange and blackish-brown enameled beads.  I don't think they were originally designed as pumpkins, but aren't they perfect? 

I thought the apple-green & coppery-orange flowers might work as pumpkin blossoms and or a pumpkin cap.  While I was at it, I picked up a couple of different strands of daggers and spiky fringe beads, too.


Time for embellishments!
For this ring, I wanted the pumpkin to sit atop its 'field' at a jaunty angle, surrounded by vines.   

Working almost entirely with size 11s, I stitched my background.  I couldn't resist adding a few small accent beads - 3mm glass pearls, 4mm crystals and another pressed glass flower.  If I'd wanted a very simple ring, I probably could have stopped here. Or maybe right before I added the pressed glass flower.  If I wasn't going for a Pumpkin ring.....

A lot of the fun with freeform peyote rings is allowing yourself to go over the top.  With that in mind, it was time to embellish. 

I love how it looks perched on the graphite sphere
here it is on my hand - hard to photograph one handed
another view on my manikin's finger
you can see the little flower from this angle

Now I have two pumpkin rings.  As for whether its magic, I'll have to wait and see about that.  :)

Happy Halloween! 

Thursday, October 22, 2015

Creative Cross-Training: Book Making


pulling out one of my old hobbies - book making
This past year, my beading has felt far more like 'work' rather than 'fun'.  It's the hazard all working artists face.  We go into our chosen field because we love what we're doing, but sooner or later, the 'shoulds' catch up to us, and attempt to leach the joy out of creation.  While I still have plenty of ideas, and get excited thinking about them, it's been hard to stay motivated and get started.  All the old fears including "what if it's not as good as it should be?", come climbing out of their dark corners.

Sound familiar?  At this point, I know the routine;  this always seems to happen after I complete a major milestone.  Burn-out combines with the impostor syndrome to sap my energy and drive.  I've learned to work through it, but it's still hard.  Especially when it lasts as long as this particular round.  

One of the ways I've learned to deal with this is to indulge in some creative cross-training.  Turning my hand towards something totally different for a little bit as a way to jump-start my creativity, or more importantly in this case, simply to refill the creative energy well.  This past summer, I decided to participate in a gift exchange with fellow cruisers on Septembers' transatlantic journey, and that my gift would be little handmade, travel sketchbooks.  Then I got carried away, and somehow found myself needing to make thirty of them.  Yep, 3-0, thirty books, each with handpainted paper covers and sewn signatures. 

It was only mid-July, and I had until mid-September to complete the project.  If I made a book a day, I'd be set!  But since this was supposed to be a fun little extra craft project (an addition to my regular work, not a substitution), I set myself a rule:  I couldn't work on the books between 7am and 6pm Monday-Friday, as those are my normal 'working hours'.  As an extra little challenge, I decided that I'd use a different stitch pattern for each book.  If the goal was to stretch, then I should really stretch, right?

One of my all-time favorite books on book-making
Pulling down my sadly dusty copy of 1-2-&3-Section Sewings:  Nonadhesive Binding Volume II by Keith Smith, I set to work.  If you have ever had an interest in bookbinding, you want this book!  It's not one of those 'sexy' books with lots of color photos of other artists' creations - I don't think there's a single color photo in the entire book.  But if you want detailed diagrams and instructions for more sewn bindings than you can easily count, then this is the book for you.  I'd forgotten just how much I love this book!

Bookmaking doesn't require a lot in the way of tools:  an awl or large needle for punching holes, something to cut your papers to size, a bonefolder for creasing the pages, and a large-eyed needle for the sewing.  Everything else is just extra, or ways to make things easier.


scoring the spine with my bonefolder before folding the cover

stitching a section - the needle is so BIG!

continuing to stitch

Since the books were for a cruise, I went with 'oceany' colors for the covers and had a great time playing with acrylic paints using my collection of brushes, scrapers, sponges, even finger painting.  I made a complete mess of my studio, and it was totally worth it!  For the interior sections, I sacrificed a couple of blank sketchbooks, cutting and folding the pages to size.  For the stitching, I used cotton rug-warp leftover from my long-ago weaving days.  (A side goal of this project was to use up 'stuff' from my collections).

I sewed this one onto 'tapes' so show the ridged design of the cover
 A couple of my painted pages had these raised designs that I didn't want to hide underneath my stitching, so I decided to sew the interior sections onto paper 'tapes' that I then wove into the cover.  I felt particularly clever, figuring these out.
Thirty finished travel sketchbooks

The first several books; everything felt really awkward.  I had to really think about each step to make sure I did it right.  With each book it got a little easier, and before long, I found myself riffing off themes.  One stitching pattern would inspire the next.  And a week before my deadline, I had a stack of thirty little book (thirty-one actually, as I made an extra for another friend).

Did it help my issues with beading?  I fear the jury's still out.  But it was definitely fun; doing something crafty purely for play.   For the reasons I started crafting in the first place, way back when. 

Have you indulged in any creative cross training lately?  I'd love to hear about it! 

Monday, October 12, 2015

Crossing the Atlantic on the Magic


"One does not discover new lands without consenting to lose sight of the shore for a very long time." - Andre Gide

There is something magical about sailing across the ocean, completely out of sight of land and civilization.  Standing on the top deck, looking out at the horizon and all you see is ocean and the curvature of the earth along the horizon.  For years I'd dreamt of crossing the Atlantic by ship.  So much of our history as a nation was founded on such voyages; I wanted to take one of my own.  Last September, I had that chance.  It was truly magical.  So much so, I managed to plan, scheme and finagle a repeat trip.

Our itinerary, on a magnet I received in a gift exchange with other cruisers
This year's crossing was a couple of days shorter than last year's, with far fewer port days, but additional sea days - eight all told.  Sailing from Barcelona, we rounded the southern coast of Spain, sailing out through the straight of Gibraltar just as the sun was starting to set.  Heading out across the Atlantic, we stopped briefly in Funchal, Madiera, then continued on to the Bahamas, with six consecutive sea days, before fetching up in Miami, where we disembarked.

Lost my shoes, but have champagne as we cross through the Straight of Gibraltar

Despite the fact that Joaquin was slowly building in the Atlantic during our crossing, the weather was picture perfect. Sunrises of molten orange, neon pink and brilliant gold were followed by days of crystal blue skies with those pretty, wispy, white clouds, and ended with sunsets of golden magenta fading to soft lavender, periwinkle, then midnight blues.  Crossing the Atlantic, the daytime temperatures hovered in the high 70s to low 80s.  Interestingly, things heated up by about ten degrees as soon as we crossed into the Caribbean Sea, well before we made land.  There's no visible line of demarcation, but if felt different.

The sea days were glorious! Open-ended days where you could do as much, or as little as you wanted. Lounge by the adult pool, watch a movie while swimming in the family pool, attend behind-the-scenes talks and interviews by some of the movers and shakers inside the Disney family, learn to draw Disney characters, learn ballroom dance, watch first-run and Disney classic movies, read a book, meet new friends, laugh (a lot), work out at the gym, take a stretch class, walk around the promenade deck or play shuffleboard, even enter a shuffle board tournament.  The list of possibilities just goes on.  And on.  One of my personal favorite things to do was to spend part of each afternoon beading, sitting in the shade on the top deck while watching movies on the big outdoor screen, with cool ocean breezes drifting by.  Here's a new pair of earrings I made one afternoon for the Frozen party scheduled for that night.

Personally, I spent most of my days up on deck enjoying the sun and the breeze.  I knew it would be full-on Fall by the time we made it back home to Seattle, so I reveled in the warmth.  That said, I'm not a direct-sun sort of girl, so I appreciated all of the shady, covered areas.  It's nice being able to nap in a lounge chair without worrying about waking up beet red!

When I tired of lounging, one of my favorite organized activities was attending the behind-the-scenes lectures.  Amongst other things, each of the people interviewed shared background on their often-circuitous career paths.  While I'm pretty sure I know what I want to do when I group up at this point, I found it fascinating; the myriad paths they took to get where they were as artists, dreamers, performers and business people.   My biggest take-aways were, there is no one path to any destination, but you have to have passion and drive to get there.  Oh, and one of the lecturers mentioned that in hiring, if he had two equally qualified candidates and one smiled during the interview and the other didn't, he'd hire the one who smiled.  Because smiling is part of the whole personality-type and mindset that he was looking for.

We also caught up on our movie watching, something we don't have much time for at home.  Besides the big screen by the adult pool, the ship also had a state of the art movie theater, and some movies were also shown in the big theatre, after the evening stage productions.

The Disney Magic is a gorgeous ship, and the cruise staff is wonderful.  From our stateroom host and dining staff, to the recreation staff, to the deck hands always hard at work maintaining the ship in tip-top order, everyone was so obviously proud of what they do, and interesting to speak with.  Simply touring the ship itself is fun, and the recreation staff put together daily photo challenge quests for those so inclined towards scavenger hunts.

And every once in a while (or so it felt) we'd pull into port and have a chance to get off the ship to explore.  I love the port days, because they give me a chance to explore places I'd likely never see otherwise; if the ship I were on didn't happen to stop there.  That was definitely the case with Madiera!

Madiera is one of those islands where steep, often sheer cliffs drop almost directly down into the sea.  The city of Funchal is terraced into the side of one of these cliffs, with only a couple of blocks of flat around the port before the city begins to rise up the mountain in a series of terraces and bridges. 

Sunrise as we sailed into Madiera, Portugal
View from the waterfront
View from the venicular
The shots I took from the funicular really don't do Madiera justice.  I wish I'd caught one that showed the terraced bridges that laced the city together.  Besides simply enjoying the view, we rode the venicular to reach the starting point for one of Madiera's most unique tourist attractions.  The toboggan ride back down the hill through the narrow, twisty city streets.


My first sight of the toboggans - extras awaiting use

I really wasn't sure I was up for it;  I am NOT an adrenaline junky (there was the very real possibility that I'd be one of the few people to ride the venicular back down the hill).   But I put screwed up my courage and hopped into one of the wicker and wood sleds beside my love.  We were guided down the hill by two gentlemen who alternately rode the back of our sled and pushed us away from what seemed like imminent danger around every curve.  They laughed and laughed as I squeaked and squawked with each new turn!  

Perched in the toboggan with one of our guides

Talk about scary fun.  If you ever find yourself in Madiera, I'd definitely recommend give it a try.  The toboggan ride takes you about half way down the hill; from there you can either catch a taxi ride (the cabbies are waiting right there) or walk down the narrow, steep twisting roads.  We chose the taxi and it was an adventure in and of itself, especially as we'd run out of Euros and had to take a detour to a cash machine so we could pay our driver.

And of course, Madeira is known for it's wine, so we had to do some wine tasting!  We decided on a single 'flight' of 15 year old wines.  The sercial was the biggest surprise to me; it started out almost sour, with a bit of a vinegary bite, but blossomed into surprising sweetness. 

A handy guide on the winery's wall
Poised to begin our wine tasting!

Castaway Cay, Disney's private island in the Bahamas, was our next port of call (following six consecutive sea days crossing the Atlantic).   Again, the weather couldn't have been more perfect.  The island is one of my favorite places on earth, so it's no surprise we were one of the first passengers ashore.  Ignoring the tram, we enjoyed the walking path around the lagoon to the family beach, where we were able to score two hammocks nestled together in the shade.  To good to pass up, we spent the early morning lounging, napping, staring up through the fronds of the palm trees at the brilliant blue sky and enjoying the live music wafting our way from further down the beach.

The morning view from my hammock
When the sun shifted enough to deprive us of our shade, we wandered down to the water, and played for a while there at the family beach before making our way over to the adults-only beach, Serenity Bay.  Since it's not protected by a breakwater, the surf was considerably higher than at the family beach.  Joe and I swam out beyond the breakers where we could enjoy the swells.  The water wasn't quite as clear as it's been on other visits, especially closer to the shore, but that was almost certainly due to Joaquin's approach (we could see the clouds building off in the distance).

Walking along the family beach lagoon
Several year's ago, Disney expanded the Family beach area of Castaway Cay to accommodate the visits of their new, larger ships the Dream and Fantasy.  We visited the island a couple of years ago on the Fantasy, and were pleased that it did not feel 'crowded'.  This was our first visit on the Magic since that expansion, and it was incredible, the feeling of space!  The only time it felt crowded at all was waiting in line for lunch over at Serenity Bay - it definitely paid to get in line early there.  Walking back towards the ship, the hammocks where we started the day were open, so we ended our beach day where we started; enjoying ocean breezes and the drifting sounds of live music before heading back to the ship to pack for disembarkation the next morning.

A squall along the horizon
About a half hour after we returned to the ship, we looked out our stateroom window to discover it was pouring, POURING rain as the ship prepared to leave port.  The seas remained relatively smooth for our last evening as we sailed to Miami, but Joaquin hit the Bahamas, and Castaway Cay, the next day.