Studio Musings

Showing posts with label right angle weave. Show all posts

Tuesday, December 1, 2015

New PDF Tutorial: Criss-Cross Lantern Beads with Right Angle Weave

Preparing for a workshop early last month, I pulled out the pattern for my Cap Beads from my book Corsets, Caps & Stays: Elegant Beaded Beads.  What would happen, I wondered, if I used some of the fun, shaped beads that have come out since then?  My new Criss-Cross Lantern beads are the result. 

I promised my students that I'd send them the revised instructions, including this variation.  And here it is, nearly a month later!  I've heavily revised the original pattern, doubling the number of detailed bead diagrams and added all-new instructions for the Lantern Bead variation. 

The Lantern Ornaments Beaded Beads PDF pattern is now available in my Etsy store.   To celebrate its release, I'm offering a special deal. 

 
2015 Holiday Special

** If you purchase a copy of my original Corsets, Caps & Stays book (either paperback or digital versions) now through December 15th, I will include the download code for my Lantern Bead PDF tutorial with your purchase. 

** Also, for friends who already own a copy of my original Corsets book and are on my mailing list, my next newsletter update will include instructions for how you can claim your free copy of this new pattern.  

To simplify my life, I've decided to post all free updates via my email newsletter from now on.  There's only one of me and trying to keep track of who purchased what, from where, and when gets to be sooo crazy, especially since I have no way of tracking Amazon sales.   Trying to track everything takes up a tremendous amount of time that I could otherwise use for designing, beading and writing.  From now on, I'll post update opportunities in my email newsletters, along with simple instructions on how to claim your PDF updates for my patterns that you've previously purchased. 

Not on my mailing list?  Click here to sign up.  Normally I send out one to two email updates per month, sometimes a little more, sometimes a little less.  It all depends on what's going on. 

This month, I've decided to get ambitious!  My plan is to send out a special update every Wednesday, starting tomorrow for the next three weeks, with a new pattern addition or update code.  If you already own the base pattern (or purchase it during my promotion), you'll receive the updates for free.   Next week I'll be sending out an addition to my Snowflakes and Stars tutorial.  This is my way of saying thank you for helping to make it possible to do what I do! 


Wednesday, August 19, 2015

Registration is now open for Fall Classes at Fusion Beads

Registration for Fall Classes at Fusion Beads opens today!  They offer an incredible selection of classes in bead weaving, pearl knotting, wire working, chainmaille and metal working, resin, fusing, PMC and more.  Their Fall catalog features seventeen pages of workshop goodness, with over eighty scheduled workshops.

I’ll admit, I’m tempted to take one of Sarah Thompson’s wire weaving classes.  Her Embrace Ring is featured at the bottom right of the  cover page.  It’s a technique that I’ve been curious about, and a class is a quick and easy way to give it a try. 

This fall, I’ll be teaching four classes between from October to just before Christmas.  Kicking off the semester with my Freeform Peyote Rings.


Freeform Peyote Rings
Sunday, October 11, 2015 from 2:00 - 5:00pm
If you’ve never tried freeform peyote stitch, this is a great place to start!   

Freeform Peyote Ruffles
Saturday, November 7 from 11:00 - 5:00pm
Ready to move on to more advanced bead weaving techniques? 

Lantern Ornament Beaded Beads
Sunday, November 15 from 2:00-5:00pm
With the holidays coming up, these elegant beaded beads make great ornaments, gift toppers, or hostess gifts.  They can also be worn as unique pendants or incorporated into other jewelry designs.

Snowflakes and Stars
Sunday, December 20th, 2:00-5:00pm
Need a beading break from the holiday madness? Come join me for an afternoon of laid back holiday cheer as we make a variety of beaded snowflakes and stars. 

Thursday, April 23, 2015

Went Fishing on Sunday, Guess what We Caught?

One of my earlier 2-Fish designs
Spent a wonderful day "fishing" at Fusion Beads this past Sunday.  The Catch of the Day were my two-faced fish pendants.  Because they're designed to lay flat when worn, only one side of the fish shows at a time.  This meant that each side could be slightly different.  They remind me of sunfish and never fail to make me smile.

My working title for the design was "One Fish, Two Fish."  Rather than fully encapsulating the core bead as in my other fish designs, these pendants allow the beauty of the central stone to shine through and become part of the design.

They're built with right angle weave, my second-most favorite (can you say that?) bead weaving stitch and what I think of as 'bead sketching' - drawing the fishy details with beads (size 15s). 


The other side of the same fish from above

Two of my students brought fish to show off from previous classes.  And they let me take pictures to share!

I love how Vala used orange thread with her cream beads for the body!

Is it just me, or does Vala's little fish look terribly sad in this picture?

Linda rocks my original Catch of the Day design, finishing it with a herringbone chain
I love their choices of colors!  Just wish I'd taken better photos.  I should have taken the pictures at the beginning of the day - my photography skills definitely decline by late afternoon.   These were the only three that even halfway came out of all the photos I took.

I also managed to snap a single pic of their works-in-progress from the class.  I waited too long and the other two students had managed to slip away before I thought to pull out my camera.  As it was, I had to snatch Linda's WIP out of her bag as she tried to pack.  I am so bad!

Vala & Linda's fish in progress.  (Linda actually started two separate fish)
I simply love teaching; it's such fun sharing my designs and seeing where others take them.  How they make them their own.  One of my students was new not only to right angle weave, but to bead weaving in general (she does come from a wire-working background).  It was interesting to see how quickly she became comfortable with the stitch.  Makes me wonder if the fact that she didn't know that right angle weave is often considered 'difficult' worked to her advantage.

Wednesday, June 18, 2014

Tales from the Tyler Bead Retreat

I've been home now for a couple of days and just starting to get back into the swing of things after returning from the Tyler Bead Retreat.  Organized by the amazing Belinda Defoor, the Retreat is a truly wonderful weekend with a stellar line up of classes - any of you living down that way I highly recommend you check it out (she'll be hosting another retreat in October). 

from left, Mandi Ainsworth, Ralonda Patterson and Karen Williams
Mandi, Ralonda and me with a packed to the gills Prius ready to hit the road
Mandi Ainsworth grabbed me at the Dallas airport, then she, Ralonda Patterson and I packed the car and headed out.  Road trip to Tyler!  Facebook friends might have seen the selfie Ralonda took of us - three teachers in a Prius!   


I was absolutely amazed we all fit.  I think Mandi's Prius might actually be a TARDIS in disguise.


the main beading room, my spot is in the lower right corner!
The retreat itself was a blast!  This being my second time around, I actually knew people (besides Mandi and Ralonda) this time.  What fun it is to walk into a room and have people you haven't seen in a year recognize you and realize you recognize them in return. 

And so much space.  The main beading room was huge, with big round tables and lots of room in between.  Made it really easy to visit other tables and see what everyone else was working on.


Catch of the Day necklace and pendant by Karen Williams
I taught two classes.  And have to admit to a slightly embarrassing secret.  I have two different fishy classes that both go by the same name at the moment.  There's the chatelaine I'll be teaching for Fusion Beads come August.  Then there's my latest class, inspired by one of the necklaces I made for Lori's Bead Soup Party last year.  This one features a fish pendant made from a modified right angle weave bezel (RAW being my second favorite stitch behind peyote.)

Both classes are currently titled "Catch of the Day".  Technically, the title really does work for both as whichever I happen to be teaching that particular day could reasonably be considered the 'catch of the day'.  But, it lacks a certain clarity. 

So now I need to find a new name for one of them.  Ideas anyone?


Lisa Steven's freeform peyote pendant
I also taught a short freeform peyote ruffles class.  Happy me.  Since we only had three hours, the class focused on making a pendant or brooch. 

Where my fish class was packed - I think I had something like eighteen students - there were only two people in my freeform class.  Some of that may have had to do with the freeform class starting at 8:30am!  But it was such wonderfully restful, yet creative class. Interestingly, both of the students in my freeform class had been in my fish class the night before, too.

Lisa Steven's finished up her freeform pendant later that day and allowed me to take a picture.  Didn't it turn out beautifully? 


Bead Crazee's store at Tyler Bead Retreat
snapped this picture as they set up one morning
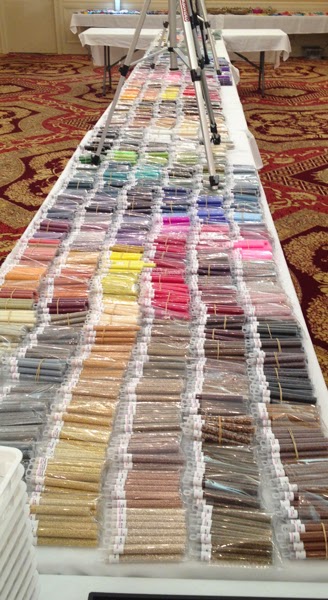
One of my favorite (and most dangerous) luxuries of being at the retreat was that the local bead store, Bead Crazee, moved the better part of their shop into the other half of the conference ballroom.  This included an incredible selection of Toho Bead seed beads laid out in an easy to browse rainbow array. 

Perfect for designing. 

Just steps away from my seat! 

See what I mean about dangerous? 


My beady purchases
I was amazed and impressed that I managed to get away so lightly. 

I bought the spools of 0ne-G from Cynthia Rutledge - she turned me on to the beading thread at last year's retreat.


Now, it's back to work on my book.  

Monday, December 2, 2013

New Things in my Etsy-verse

I thought I'd put together a quick post about new listings in my Etsy-verse.  Most of my 'new' listings are really variations on established themes.

First there's my new Beaded Bead Collections. 

Purple Frost pendant necklace by Karen Williams - kits available on Etsy
Purple Frost pendant kits, $25
One of my Corset and Stays beaded beads, my Purple Frost kit comes with everything you need turn it into a pendant necklace or ornament, including an extra long headpin and a ribbon necklace blank. Looking at it here on my blog, the angle on the pendant in the photo looks a bit wonky; I may need to try and retake this photo. 

I'm a sucker for beaded Christmas ornaments, so I had to turn my Corset Beads to the task, coming up with my Yule Tidings kit with all the beads and materials to make six beaded beads.  This kit includes the full PDF of my book Corsets, Caps and Stays (if you'd rather the print version of my book, let me know - as a blogger friend I'll make the substitution for free through the new year). 
Yule Tidings Miniature Ornament Collection - kits available on Etsy
Yule Tidings Miniature Ornament Collection - Beaded Beads kit, $54
While it doesn't show the whole collection, I think this is one of my favorite photos
The bead on the far right above reminds me of a Japanese lantern, I love the warm of the dark bronze metallic iris beads against the deep ruby red and olivey greens. 

Want to tackle a larger project?  There's my Stars at Midnight necklace kit.  This is the necklace featured in my book - I finally gathered all of the materials and put together kits so you can make your own version.  Including again, a full PDF of my book

Stars at Midnight long necklace - kits available on Etsy
Stars at Midnight long necklace kit, $62

I've also brought back my Personal Planets series of freeform peyote beaded beads.  This was one of the classes I'd proposed for Bead & Button and Bead Fest, but since neither were interested, I'm slowly adding the kits to my Etsy shop.  For now, there's Quinacridone Summer (inspired by a painting by the fantastic artist JJ Jacobs) and my newest beauty: 

Whispers in Pink, freeform peyote beaded bead - kits available on Etsy
Whispers in Pink, freeform peyote beaded bead kit, $41
With Whispers in Pink, I had a great time playing with magatamas, tila beads and baby spikes and included all three in the kits.   The strong silvers and blue-greys combined with the spikes give it a harder, almost industrial feel, but the whispers of pinks and lavender add a hint of the romantic, keeping it from tipping over the edge. 

Whispers in Pink hung from its Kumihimo braid
Whispers with its Kumihimo braid
This is one of my all time favorite beaded beads.  And the photo above is another of my favorite photos. I love how Whispers seems to float in a sea of darkness, like a planet drifting through space.
  

All of my Personal Planets kits include two base beads and more than enough seed beads so you'll have some left over when you're done.  In the photo at right I used some of my extra beads in a Kumihimo braid, finishing it off as a necklace. Each kit comes with my extra-long headpins to make quick pendants.  Whispers is a little more expensive than my Quinacridone Summer kit simply because the beads (including the 14 baby spikes) are more expensive. 


Then there's my newest Fish Friend kit.  Way back in college I had a Betta Fighting Fish named Mordred in just these colors.  So I thought of naming this kit after him, but for now it's simply called Rumble Fish, because I think that's fun enough as it is.  (And that was one of my favorite book titles back in the day). 

Rumble Fish, 3D Beadwoven Fish kits available on Etsy
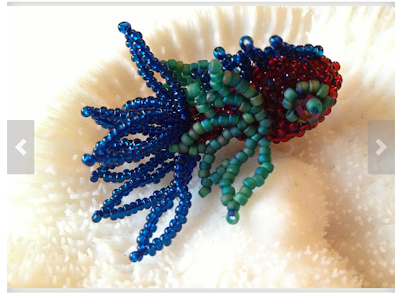
One of my Rumble Fish hanging out in some coral, $45
Each of my Fancy fish kits should make three to four fish.  They all come with four bead cores, and I've used each kit myself in the testing process.  Others in this series include Ellie the Elegant (also known as my Wedding Fish kits), Rosie the Red and Blue Fish, who are stuck with the Dr. Seuss name for life. 

And in case I haven't shared it here yet,  I've also put together some new Snowflake kits, like this one:

Peppermint Twist Beaded Snowflakes - beading kits available on Etsy
Peppermint Twist Beaded Snowflake Kits, $27.50
Each kit is designed to make LOTS of snowflakes - it just looks prettier in the thumbnail when I only include one. 

So that's what's new at Skunk Hill Studio.

My Stash to Your Stash

I've also openned a new little shop called MyStash2YourStash for, you guessed it, Destashing!  I was totally surprised that someone else hadn't already grabbed the name.

I'm a collector.  I start into a new artistic or crafty medium and I start collecting.  Many of the items in my studio were gifts, some have been passed on to me by other crafters, much of it I've purchased.  When I move on to something new, the old gets carefully stored away against future need.  But after moving my studio (and everything in it) twice this year I've decided that maybe it really is time to let a few of these things go to new, loving homes.

So far, what you'll find are my Crazy Quilting grab bags containing smaller squares of fabrics, lots of trimmings, buttons, braids, lace, yoyos and more.  I spent ---far---- too much time putting together these themed kits, but I'm really hoping people will love them.

All the listings in my new Destashing store

Some of the items in my Garden Greens collection

from my Arabian Knights grab bag
While I collected all of this for crazy quilting, I've also used them to make ornaments and decorate masks, and they'd work well for Barbie doll clothes, too.   I just popped over to MyStash to grab the screenshots and discovered it has an admirer!  Wow, someone found my store through search!

After the new year, I plan to add more to both stores.  Let me know if there's anything in particular that you'd love to see.


Tuesday, December 25, 2012

New Leaf Pendant

New Leaf Pendant by Karen Williams, polymer clay leaf by Jeannie Dukic
It's been a very topsy turvy sort of month, full of ups and downs and I haven't managed to finish a blog post in almost two weeks, nor had much energy to visit my favorite blogs.  I've missed you all!

The month began with a wonderful visit with family (I promise I will post some pictures from the trip). Unfortunately, Joe and I woke the morning after our return to discover new colds had waited for us quite impatiently.  They've been the sort of guests who greatly overstay their welcome.  I'm hoping to find a shiny new immune system under the Christmas tree. Or better yet, a matched his and hers set.  That would be splendid!

New Leaf Pendant by Karen Williams, polymer clay leaf by Jeannie Dukic
But in this post I wanted to wish you a very, very Merry Christmas filled with good company and good cheer.  We're having a quiet one this year, but expect it to be quite lovely.  A couple of our friends will join us this afternoon for games and dinner and to share a fairly simple (but yummy) Christmas dinner.

I also wanted to share my New Leaf pendant, my entry for this month's Echo Creative Club. Jeannie's polymer clay leaf made me think of the New Year and new beginnings. And New Year's celebrations.

I thought I'd create a brooch with lots of festive corkscrews to remind me of streamers. Somewhere along the way it became a pendant. It's a much simpler design than my usual, but I like it.

Now I need to go see everyone else's designs.

New Leaf Pendant by Karen Williams, polymer clay leaf by Jeannie Dukic

Cindy Cima Edwards http://www.cindycima.com/
Donna Martin Bradley http://strandedbeads.blogspot.com/
Jeannie K Dukic http://site.jkdjewelry.com/blog
Jessica Klaaren http://www.cellardoorjewelry.blogspot.com/
Karen Williams http://baublicious.blogspot.com/
Kashmira Patel http://sadafulee.blogspot.com/
Kristen Stevens http://kristen-beadjourney.blogspot.com/
Lisa Lodge http://gratefulartist.blogspot.com/
Lola Surwillo http://www.beadlolabead.blogspot.com/
Shannon Chomanczuk http://www.formysweetdaughter.blogspot.com/

Jeannie's currently accepting applications for next years Echo Creative Club. 


Monday, December 10, 2012

Spring Classes at Fusion Beads

Fusion Beads has published their complete schedule of Spring classes.  (download a full-color newsletter). They offer one of the best selections I've ever seen - with over fourteen pages of classes this time around, including classes in wire working and metal smithing, resin, fusing, jewelry clay, macrame & cord, PMC, chainmaille and of course, Beadweaving! 

Even if you don't live in Seattle, if you're thinking of planning a trip to the area you might give their schedule a peak - they offer classes almost every single day

Taking a peek at the schedule myself, I just discovered that my Corset & Stays Beaded Bead class is one of those featured on the front cover! In case you're wondering, I'll be teaching on February on February 3rd. 

Registration begins at 10 a.m. Thursday, December 13.


Oh, and now through Dec. 16, 2012, FusionBeads.com will donate $1 to Treehouse, an organization that supports foster children with the purchase of any TierraCast plated pewter holiday charm

I think this is pretty cool as most of the charms seem to run about $1.50.   I haven't seen them in person, but several of these charms look way cute from their pictures. 

Thursday, October 25, 2012

A Time to Stitch - Right Angle Weave

Today's the reveal for the Time to Stitch blog hop sponsored by Christine of One Kiss Creations and Therese of Therese's Treasures featuring Right Angle Weave or St Petersburg stitch.

Well, it seems as if pretty much all I've done this past month is right angle weave.  I've pretty much ate, drunk and slept the stitch as I worked to finish my new book and prepared for Bead Fest Texas.  Mostly, I've been stitching samples for kits that I'll be taking with me to Bead Fest, then posting on my Etsy shop hopefully next week.  

So here are a few of the pieces I finished this week:

Just finished this one on Monday

Snowfall - an look it has sequins! 
Bead caps and bail using right angle weave
This one's Random Right Angle Weave
Finished this one earlier this month, but it's all right angle weave, so thought I'd show it again
Now I need to go and finish packing.  But be sure to check out what the other pariticipants have done with the two stitches.

Therese Frank and Christine Altmiller
Nikki Byers
Kristen Stevens
Shirley Moore
Sonya Stille
Karen Williams

Friday, October 12, 2012

It's Almost Live....


Front Book Cover: Corsets, Caps & Stays: Elegant Beaded Beads with Right Angle Weave
I have an ISBN number!  My newest book, Corsets, Caps and Stays: Elegant Beaded Beads with Right Angle Weave, is at the publishers.  And while I don't have a physical copy of the book itself yet, I do have its ISBN number (two actually):
      ISBN-13: 9781480074910
      ISBN-10: 1480074918
I can't tell you how exciting it is to see those numbers!

Those of you who have been following my blog for a while have likely seen the book progress. It's pretty much taken over my life the past several months, though I've tried not to write about it too much here in the blog for fear of boring everyone to tears.


editing interior book pages - successive edits
color coded edits & several takes on one page
It's such a slow process - on good days, I might finish putting together the illustrations and text for a two-page spread.  Or maybe I'd do initial layout for several pages.  Or stitch another sample while taking notes and process photos, then upload everything into my computer for revision.  Every page required multiple, multiple revisions.   It seemed at times like a never ending cycle. I came up with a color coded system to track the various edits (pink for text edits, yellow-illustrations, green-photos, blue the page's ready to print for the next review!)

But I had a hard deadline, as I want to take copies of it with me to Bead Fest Texas, which is just around the corner.  Which meant that I needed send the book to the printer in time to get it proofed AND printed.  And time kept slipping away....


PDF proof of Corsets, Caps & Stays
PDF proof from Createspace with ISBN numbers!

So I worked twelve hour days on it last week, and over the weekend.  On Monday, I spent eight hours doing a final proof, then saved the files to PDF (separate files for the interior and cover) and uploaded them to Createspace.  They promised a 48 hour turn-around for a digitial proof, but when I checked at 5:00am (yes, really) the next morning it was in.  Yeah!

Except they said that one of my images was under 300DPI, the recommended printing resolution.  Not Yeah!  So I opened my InDesign file to find the offending image.  And since I was already in the file and they'd created such lovely proofing options, I went through the book one more time.  Another three hours of proofing.

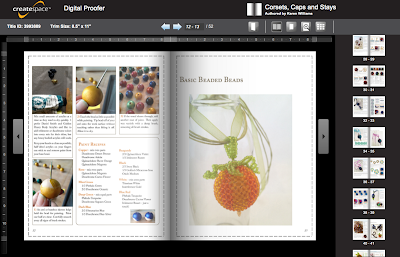
Besides sending me a PDF copy with trim marks, they also have a cool virtual proofing option that tries to show you exactly what it will look like as a physical book.  I took a screenshot so you could see what I mean. 

virtual proof of Corsets, Caps & Stays
Virtual proof - they even tried to simulate page turns

The digital proofing system is new since my first book and I thought it quite nifty.

Back Book Cover: Corsets, Caps and Stays: Elegant Beaded Beads with Right Angle Weave
I have a barcode, too! 
This project started out as a class handout, but kept growing. When I taught my Corset Beads at the June Seedbeader's meeting, the handout stood at a healthy eleven pages.  Based on that class, and questions that came up, it grew to twenty five pages.  Which I thought would be it.  But I couldn't stop thinking about it, asking 'what ifs'.  So I decided to let it do what it would.  The final version topped out at 51 pages.  A short book, but a long tutorial, which is the way I still think of it. 

It's a very hands-on and project oriented, with explicit bead counts and stitching instructions.  This is so different from my freeform peyote beading that I'm still vaguely stunned that I managed it.  I spent an entire summer counting stitches and making diagrams!

Unlike Freeform Peyote Beading, which starts with an extensive design section, this one dives right into the stitching.  The first chapter reviews the stitches - all the different aspects of single needle right angle weave used in the rest of the book, talks a little about needles and threads, and has a quickie tutorial on painting wooden beads.  Then it's off into the projects.

Chapter head: Corsets, Caps & Stays Beaded Beads
Chapter Head Screen shot
There are three chapters on different styles of beaded beads, each with multiple samples and design variations. First up are the 'solid' beads, completely covered with bead weaving.  My Corsets & Stays beads, with their central band of beading laced onto the base bead (hence the reference to corsets) come next.  Then my Caps & Stays beads, with two beaded end caps connected by right angle weave stays.  I rounded the book out with a chapter on Finishing Touches, including a beaded bail, the spiral twists and the leaf from the bead shown in the proof above, a beaded rope and toggle and some ideas for incorporating the beads into larger designs.

So now all I have to do is wait for the books to arrive.  That will be like Christmas.  And a little scary too - there's that little fear, too.  What have I done!?!

In the meantime, I'm working on kits for Bead Fest and to add to Etsy.   I'm finally starting to get a system together and streamlining things there, too. 

Thursday, April 26, 2012

I'm Gonna Teach in Texas

Corset & Stays beaded beads, Saturday October 27th
The class signups for Bead Fest Texas went live yesterday, including my two evening classes!  Woo hoo!  Time for a happy dance.  Even better, for today at least, my Lacework Bracelet is one of their featured workshops.  How cool is that?
 
Both of my classes are right angle weave, no peyote stitch.  I have to laugh a little at the irony in that.   Luckily right angle weave is my second most favorite stitch (and combines beautifully with peyote stitch).  Besides the Lacework Bracelet, I'll also be teaching my right angle weave Corset and Stays spoke beads on Saturday, October 27th.  Definitely one of those you-can't-stitch-just-one sorts of patterns.

It's likely just me, but ever since I got the news back in February that I'd be teaching in Texas this fall, I periodically find myself humming a certain tune....  

And for those looking for little freeform peyote, I'll be teaching my Freeform Ruffles class again here in Seattle on June 10th at Fusion Beads.

Friday, April 13, 2012

The Create Badge of Courage

Cabochon by Shelly Gillmann, beading by yours truly
Just finished up my taxes yesterday - woo hoo! Done for another year. The grand total came to 46 pages of forms and worksheets. Since that's now done, I headed back to my bead table to complete another, much more fun project, inspired by my Capturing Cabochons/Beaded Bezel class this Sunday.  I always like to have at least one completely fresh and new sample ready.  So here it is - the Create Badge of Courage.  All it needs is a pin back sewn to the beaded 'ribbon' above and it will be ready for service.

I shared the cabochon, made my friend and fellow artist Shelly Gillmann in an earlier blog post.  I ended up using only a subset of the beads selected for the project.  I like they way they echo the colors and even the textures in the cabachon itself.  One of the other ladies at my open studio brought the antique glass glitter, which Shelly made wonderful use of in this piece. 

Stages of work


Originally, I thought I'd turn the cab into either a pendant or a simple brooch.  By the time I finished the back, I knew I didn't want to cover any of it up with a pin back.  That would just disrupt the flow.  But I really liked the idea of it as a brooch. 

And with its stamped command/message/motto, it seemed almost too adamant for a pendant.  Then I had the idea of suspending it from a ribbon and turning it into a 'medal'.  Yes!

Originally I'd intended to use regular right angle weave for the ribbon, but as soon as I started filling the center, that fell by the wayside.  Regular raw increases would be much cleaner and symmetrical, as opposed to the slightly wonky ribbon I ended up with.  Since I stitched the ribbon on after, using entirely new thread, I can always cut it off and try again.  But I think I'll let it stand as is for now.  Creativity can be a little wonky.

Now all I need is a pin back and It will be done (that's why there's still a thread hanging - I thought of cutting it off for the picture, but then I'd just have to start a new one to finish the piece.)

Monday, March 5, 2012

Time for School


These guys are surprisingly difficult to photograph, but here's my current school of Fancy Goldfish.  The one at top right was a Christmas gift for my husband, and he requested a single line of thread so he could hang it in his office, which is what you see trailing off to the side.  It's loosely based on a Japanese Fighting Fish.  But then I stole it back for photographs.  :)

Monday, December 26, 2011

A Little Something for Boxing Day

Recently, several of my bead weaver friends have commented that right angle weave simply gives them fits. Since it happens to be one of my favorite stitches, I thought I'd put together my own take on the basic stitch, single needle style. I've got a quick overview here.  After the holidays, I'll put together a more in-depth look, including basic increases and decreases on my website, so be sure to check back in early January!

Add 4 beads 1st unit, 3 beads 2nd
The Basic Right Angle Weave Unit
String four beads onto your thread.  Stitch through your first two beads to create a loop (your stitching should form a spiraling loop and a half).  Congratulations!  You've just created the basic right angle weave (RAW) unit!  Each basic RAW unit is composed of exactly four beads.

Building our First Row 
Looking at a circle of right angle weave, you'll note that each unit has a top, bottom and two sides. We will build our next RAW unit off of one of those side beads. (I choose the right hand bead in my diagram).  Reposition your needle if necessary (diagram 2). 

Since we already have one of the beads we need, we will only pick up three beads this time. Stitch back through the side bead of unit one to finish the unit, and reposition your needle by stitching through two of your new beads.

Looping Figure 8 stitch pattern


The stitch pattern is a looping Figure Eight.  If you can see this, you're good to go. 

I'll keep working off of the right-most bead to build additional units.  One time I'll loop up from the bottom, the next I'll loop down from the top.  But in this row, each new right angle weave is built with three additional beads. 


Building Row Two
Building our Second Row
We will work off of the top or bottom beads to build our second row.  I've chosen to work off of the top beads in my diagrams at left.

To build your first unit of row two, pick up three beads, and complete the circle through the top bead of the last RAW unit from row one. 

The trick:  You already have two of the beads necessary to build the second RAW unit in this row.  Take a look a the diagram - you already have the bottom and right side beads, so you'll only need to add two beads this time.

Reposition your needle by stitching up through the side bead of your current unit.  Add two beads.  Complete the circle.

Following the stitch pattern, reposition your needle and add two more beads.  Keep going until you reach the end of your row! 


Three rows of RAW.  Secure thread by stitching
Additional Rows
Build Additional rows the same way you built your second row.  Always start a new row by adding three beads.  Continue building the row by adding two beads at a time for each new RAW unit after that.

Securing Your Thread
The best way to secure your thread ends is simply to stitch back into the main body of your bead work and stitch through several figure eights.  The direction changes in the stitch pattern will keep everything tight and secure. 

Do this with both your beginning and ending threads. 

And that's it.  That's basic Right Angle Weave (with a single needle).