Studio Musings

Showing posts with label freeform peyote. Show all posts

Monday, May 1, 2017

It's Done! Just in time for the UnFinished Object Blog Hop!

I trimmed the last beading thread Sunday afternoon and there was much rejoicing!  Thanks to two back-to-back UnFinished Objects Challenges, one of my oldest UFOs is finally complete.  I started work on this collar back in 2012 - and picked it up now and then through the years.  The collar just kept growing, without ever nearing completion.  It reminded me of an explanation one of my early teachers used about approaching infinity numerically - that you could get closer and closer to infinity, but by it's very nature, you could never actually reach infinity by counting. 

Thank goodness that wasn't truly the case here, as the picture shows!  And thank you to everyone who helped make this possible by agreeing to participate in another blog hop.  This blog hop up was just the push I needed.  Without you, it likely remained an UFO another five years!  I'm hoping those of you who joined int found the challenge useful, too. 

Curious about what everyone else worked on?  I know I am!  Here's the complete list of participants to see their progress:

Karen Williams, Baublicious
Francie Broadie,  FAB
Christine Van Dyke Altmiller, One Kiss Creations
Kim Dworak, CianciBlue
Liz Hart, Treetop Life
Amy Severino, Amy Beads
Cynthia Machata, Antiquity Travelers
Hope Smitherman, Crafty Hope
Christi Carter, Sweetpea Path
Bobbie Rafferty, Beadsong Jewelry
Margo Lynn Hablutzel, My World and It's Full of Books

And here are a few additional photos of my Starry Night Collar. 

where I was on Friday as I tested the collar against my template
The shawl-like shape was different from any other necklace or collar I've made, and presented some unique challenges in getting everything to lay properly when worn.  The final connection I needed to make was at the back, just behind my right shoulder.  I couldn't get the shape right working flat, and I didn't have any handy person waiting around to be my model.  (I could have likely talked my husband into doing it, but he's simply not the right size!)  I ended up doing a little beading, then adding a thread guide, and put it on and had him snap a picture, so I could at least see how the connection should look.  It let me see the shape I was working with. 

my thread guides show just how far off I would have been - I thought they'd be straight
Shortly thereafter, I did manage to find a friend willing to stop by and let me do a final fitting on them before doing the last few lines of stitching.

Laid out 'flat' (or flatish) to see the whole collar
Because it's designed to drape over the shoulders, it doesn't lay completely flat when the clasp is fastened.  You can see it buckling over on the right hand side if the photo. 

Several people had asked to see the collar on a human.  Unfortunately, I once again had no one but myself as a model.  This was the best collar selfie I managed to take:

It's really hard when you're both the model and the photographer!
One more photo with a black background.


And there you have it!  Truth is, I don't quite believe it's really done! 

Sunday, May 1, 2016

Teresa Shelton's Spring Ring Fling

Spring inspiration, Teresa Shelton
Teresa Shelton jumped into the Spring Ring Fling with both feet, creating not one, not two, not even three, but four separate rings.  Here's Teresa talking about her designs:

It’s been so long since I did freeform peyote work that I had forgotten how much I enjoyed the freedom of it. For the past several years I’ve primarily been doing a lot of geometric beadwork which is rigid in form and structure but still creative in application. Once I got started on the first ring, the joy of freeform expression was familiar and inviting, much like reconnecting with an old friend, and I savored the chance to fall back into those comfortable rhythms.

Spring is my favorite time of year and I can’t wait to see everything wake up again and return to life. The first ring is inspired by the first apple buds and leaves that sprout from dormant branches and yearn for the Spring sun. At our house, the apple tree vibrates and hums as the bees find the bounty in their early blossoms. The ring, Apple Blossoms, was started shank first with a single row of beads followed by several rounds of freeform peyote. The branch, leaves, and blossoms were beaded separately and then attached to the shank through a flat washer looking trade bead which has an added bonus of allowing the branch to rotate on top of the shank.


Teresa Shelton's Apple Blossom Ring


After the first ring was well under way, so many more Spring Fling ring inspirations hit me all at once and I wondered if I’d find the time to create everything I was exploring in my head. Daffodils are my favorite flower and one of the first Spring flowers to bloom in our yard. Several years ago, I purchased a lampworked daffodil bead from Serena Smith at a local bead show and tucked it into my purse. When I got home, I found one daffodil petal had broken from banging around against who-knows-what in my purse.


I kept the broken bead and figured I would find a way to use it in time (The beads tell me what they want when the time is right, I have only to listen and wait for their suggestions). First Bloom gave me the opportunity to use this beautiful but neglected bead. The single missing petal was created with seed beads, then a blend of freeform peyote and 5 sets of geometric herringbone increases was sculpted around the base of the bead. The shank was created and added after the flower, petal, and foliage were assembled.

Teresa Shelton's First Bloom

Teresa's First Bloom, worn

A side view of Teresa's ring (it's easier to see the beading)
Why stop at two rings when there was a whole month to create and rings only use a few hours of stolen time?

Spirals are everywhere in nature and the universe, and I seem to gravitate to this shape so why not explore it in beads. In New Zealand, the spiral-shaped Maori koru is reminiscent of an unfurling fern frond, symbolizing new beginnings – yet another Spring theme. I usually steer clear of pink in my beadwork and never pair pink with orange but a beader friend of mine recently made me some earrings in hot pink, orange, bright green and bronze. Everyone I’ve shown them to loves the color combination so I guess it was time to emerge from my habitually comfortable color cave and see what new paths I could discover. New Beginnings started with the spiral and worked from the center out. The shank was beaded later and has a diagonal transition in two locations between the hot pink and orange colors so they also spiral around the shank.

Teresa Shelton's New Beginnings spiral

a side view of Teresa's ring

starting point for Pacified
The final ring in this series, Pacified, blends my love of the geometric beadwork with the freedom of freeform peyote. I had an older exploded warped square (technique from Contemporary Geometric Beadwork) in pastel colors which reminds me of the soft, muted sunlight emerging in Spring. The shank is a simple square-stitch connection of two of the warped square tips which creates an open ring base to build from. To the base, I added several lacy trusses of netting and introduced peyote in subsequent passes to add structure and support for the heavier beads near the top of the ring. After it was completed, my husband commented that it looked like a pacifier with the center tear-dropped focal extending up so high.


Teresa Shelton's final ring, Pacified

Thanks Karen for organizing and facilitating this challenge as well as hosting me as a guest blogger on your site.

****

Teresa Shelton, who beads under the pseudonym Keygirl, has been creating art with seed beads for over 25 years. You can see more of her work on her Facebook Artist’s page or e-mail her at keygirl designs gmail com. 

Monday, April 11, 2016

New Classes at Fusion Beads this Summer

I'm teaching two new classes at Fusion Beads this summer.  In July, I'll be sharing my spin on more freeform bead embroidery with my Happy Fish.  These little guys, my newest additions to my underwater menagerie of beaded fish friends, were inspired by Robin Atkin's Bead Journal Project.  I needed a theme I'd enjoy working with for a year, and smiling fish fit the bill. 

And in August, I'll focus on the techniques I used to create my Nautillus Flower Cuff, from Explorations


Sign-ups for Summer workshops begins this Thursday, April 14th.

If you're planning to visit Seattle this summer, definitely check out their classes catalog. They have one of the best, most varied schedules you'll see outside of a major beading conference. 


Thursday, February 18, 2016

More Freeform Peyote Rings - my new 'Spring Woods' Collection

Last week I shared a couple of Valentine's Rings I made in preparation for my weekend workshop on the topic at Fusion Beads.  This week, I thought I'd share the two rings I started in class. 

Going into the class, here's the one I'd originally planned:

Robin's Nest ring with three crystal 'eggs' by artist Karen Williams
Robin's Nest ring with three crystal 'eggs'

I wanted my own "Robin's Nest" ring, complete with crystal 'eggs'.  One of my students asked about incorporating bugles into a freeform peyote ring.  This was the perfect chance to use some 6mm bugles both in the base and while building the nest. 


an alternate view of the Robin's Nest ring by Karen Williams
you can almost see the bugles I used in the band from this view
The Robin's Nest was a great example of adding embellishments after building the bulk of the ring.  After I finished the base ring, I positioned the three eggs, then began building the nest around them.  (Not quite how mama Robin would have done things, but it worked for me).

Just starting to work on the 'nest'.  Freeform peyote ring by Karen Williams
Just starting to work on the 'nest'

Helping my students in class, I decided I also needed a sample where I added my focal bead in the first row/ring.  So I ran out into the store and purchased a 10mm round druzy that worked with the bead colors I had with me.  I'm really, really bad about taking process photos while I'm teaching, since my focus is on my students, not my work.  So I don't have a single process photo for this ring. 

Dogwood Blossom freeform peyote ring by Karen Williams
Dogwood Blossom pinky ring
You can't really tell that the focal beads is a druzy in the ring's final incarnation.  It's entire look changed when I decided at the last minute to try adding some pressed glass leaves as flower petals around the core.   The 'petals' reminded me of a dogwood blossom, so I decided to run with it.  But they wanted to flop closed, so I added some beading inside the and between the ring of petals to hold them open. 

The funny thing is this ring's band is one of my smallest - sized to fit my pinky - while the dogwood blossom makes it one of my largest rings. 

Spring Woods freeform peyote rings by Karen Williams
Both rings side-by-side for comparison
Here you can see both rings together for comparison.   I've decided they are my new Spring Woods collection, created using a soft, muted palette of warm browns, antique coppers and lilac, with splashes of sky blue and olive green that reminds me of the earliest days of spring. 

I also found myself thinking that both rings would be right at home in the Hundred Acre Wood. 

Wednesday, August 19, 2015

Registration is now open for Fall Classes at Fusion Beads

Registration for Fall Classes at Fusion Beads opens today!  They offer an incredible selection of classes in bead weaving, pearl knotting, wire working, chainmaille and metal working, resin, fusing, PMC and more.  Their Fall catalog features seventeen pages of workshop goodness, with over eighty scheduled workshops.

I’ll admit, I’m tempted to take one of Sarah Thompson’s wire weaving classes.  Her Embrace Ring is featured at the bottom right of the  cover page.  It’s a technique that I’ve been curious about, and a class is a quick and easy way to give it a try. 

This fall, I’ll be teaching four classes between from October to just before Christmas.  Kicking off the semester with my Freeform Peyote Rings.


Freeform Peyote Rings
Sunday, October 11, 2015 from 2:00 - 5:00pm
If you’ve never tried freeform peyote stitch, this is a great place to start!   

Freeform Peyote Ruffles
Saturday, November 7 from 11:00 - 5:00pm
Ready to move on to more advanced bead weaving techniques? 

Lantern Ornament Beaded Beads
Sunday, November 15 from 2:00-5:00pm
With the holidays coming up, these elegant beaded beads make great ornaments, gift toppers, or hostess gifts.  They can also be worn as unique pendants or incorporated into other jewelry designs.

Snowflakes and Stars
Sunday, December 20th, 2:00-5:00pm
Need a beading break from the holiday madness? Come join me for an afternoon of laid back holiday cheer as we make a variety of beaded snowflakes and stars. 

Thursday, March 12, 2015

Thinking about Peyote Stitch

I've recently received a couple of emails from people who are having trouble with the concept of freeform peyote stitch.  Since I've spent a fair bit of time trying to answer those emails, I thought I'd turn them into a blog post. 

To understand freeform beadweaving, you first need to have a strong understanding of the regular version of the stitch.

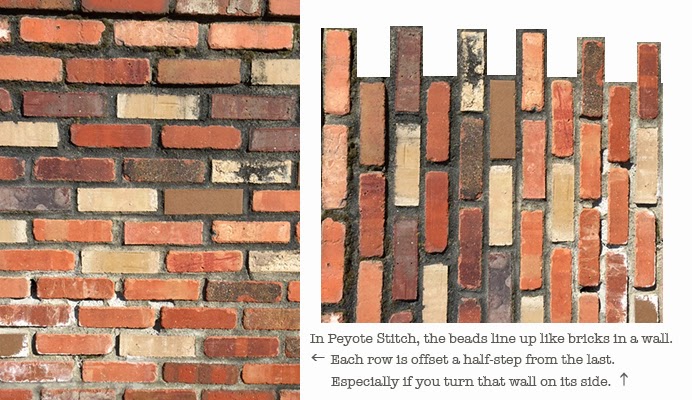
The beads in Peyote Stitch line up like bricks in a wall, especially if you turn that wall on its side.

  • Peyote Stitch reminds me of bricks in a wall; each row is offset a half-step from its immediate neighbors.  (Above Left)
  • Turn the brick wall on its side, and the similarity is even more pronounced. (Above Right)
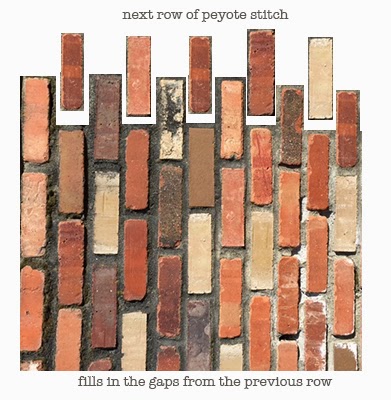
  • With the wall on its side, the gaps at the top show you where you need to place the bricks (or beads) to build the next row of peyote stitch.  

the next row of peyote stitch fills in the gaps left by the previous row.

This assumes you are working with materials (bricks or beads) of roughly the same size.  

What happens if your bricks or beads come in a bunch of different sizes?  This is where Freeform Peyote comes in!


Don't throw out the whole concept of peyote stitch.  You will still be working with rows offset by a half step from neighboring rows to either side.


  • Like the photos of the stone and brick wall above, you will still have very recognizable sections of peyote stitch. 
  • The key is marrying the sections.
  • It can help to organize your beads by size - I find freeform peyote is easier when I group like with like.  
  • Build discrete sections with the different sizes of beads, don't just mix them willy-nilly.
  • Freeform is not random.  It is a more organic melding of different sizes and shapes. 

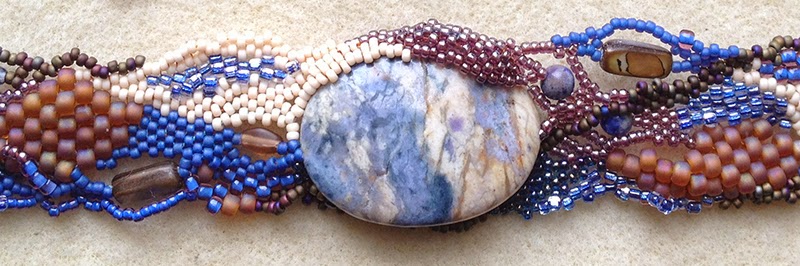
detail, Winter Blues freeform peyote bracelet by Karen Williams

This example of freeform peyote doesn't have the extreme size variances of the stone and brick wall, but you can see how I've grouped sections of similarly sized beads together.  My larger accent and focal beads are surrounded and supported by peyote stitch.

Last tips
  • Don't try (or expect) to do everything at once!
  • Just like building a wall, you will work one row at a time.
  • With each row, you have the opportunity to make decisions regarding bead sizes, shapes (and colors).

Saturday, February 21, 2015

Creative Spark - Winter Edition

Cover, Creative Spark magazine edited by Hope Smitherman and produced by ZnetShows
Creative Spark, Winter 2015
The latest issue of Creative Spark, ZnetShows' design magazine meets winter head-on, delivering an avalanche of snowy inspiration; no snow shovels required.

I was again asked to participate and submit a design, working with their lovely cultured sea glass and the theme "Icy".  Living by the ocean, one of my favorite things is to go beach combing, searching for sea glass.  But Znetshows definitely has a way of spoiling a person.  Their cultured sea glass has all of the soft lustre of real sea glass, and comes in a huge range of shapes, colors and sizes.  The trickiest part for me was figuring out how to fit into the winter theme, when the glass kept whispering 'warm summer sun'.

Taking a departure from freeform peyote for a wee bit, I created a choker style necklace with regular peyote stitch and netted fringe loosely inspired by the Roaring 20's using several peridot-green, diamond-shaped sea glass drops as the accent beads.  Working with the theme "Wintergreen", I paired the drops with bright, iridescent white and iridescent crystal seed beads. 

In the end, I couldn't resist creating a little freeform peyote ring showcasing one of their sea stars.  Curious to see what I created?  My necklace is on page 10.  But mine are only a couple of the many, many featured designs, including bead weaving, stringing, wirework, and more by nearly two dozen designers. 

Hope Smitherman has once again put together a stellar line-up, filled with wonderful beady eye candy and inspiration, along with several fun surprises.  Be sure to check it out