Studio Musings

Saturday, December 26, 2015

A Little Box for Boxing Day

Three little boxes - one decorated with a handmade rubber stamp
Here's a cute little box pattern for Boxing Day.  It's made from a single sheet of paper, and I'm thinking that it could be used for gifting handmade jewelry or other little presents.  I like the idea of a handmade little box to complete a handmade gift presentation. 

I designed the box so it slots together with tabs, so no glue is required for assembly.  For the smaller white boxes, I simply used white index paper that I buy by the ream at my local office supply store. 


My notes as I played with ideas for the design
One of my Christmas gifts this year was a Cricut Explore Air cutting machine.  While it was ostensibly a Christmas gift, Joe gave it to me a little before Thanksgiving so I could play with it heading into the holidays.  The Cricut is designed to cut paper, card stock, vinyl, even fabric, felt and leather.  You can work with the designs in their library, or create your own. 

I'm just starting to explore the possibilities.   My machine came with a short, free subscription to their design library, so I've mostly played with their images and projects, seeing how you can combine and modify them to become familiar with the software.  This box is my first truly 'solo' design.


The template works with an 8 1/2 x 11" sheet of card stock

Here's the pattern template ready to be cut.  I saved the image full size so you should be able to click on it to get a larger version.  It's designed to fit a regular 8 1/2" x 11" sheet of card stock, and could be cut out using an Xacto knife or scissors.   And if you have a Cricut cutter, here's a link to the project file - feel free to use it as you wish!  You can easily resize the design using the Cricut software. 

I made the larger red box by scaling the pattern up to use a 12 x 12" sheet of card stock. 


Friday, December 25, 2015

Mystery Christmas Present

Late yesterday evening, a last package showed up at our doorstep.  A padded manila envelope, clearly addressed to me - totally mystified, I opened it.  Inside I found this fun, fun turtle cookie cutter enclosed in a ziploc baggie.  No note, nothing to indicate who it was from. 

Just a mystery Honu, who somehow washed up on the shores of chilly Seattle instead of sunny Hawaii. 


Since I happened to have sugar cookie made up and ready to roll, I put him right to work today! Then I decided he needed a couple of friends to make him feel more at home. 


My cookie decorating skills are about on par with a child playing with finger paints.  They will NEVER win any awards, but they sure are fun!  I do like the rooster - I think he is definitely my 'best decorated'. 


Joe snapped this one of my Santa Turtle.  So, to whomever sent me the turtle - thank you!  He sure is fun.

And Merry Christmas to all of my friends who celebrate the day.  Here's hoping for a day filled with light, love and laughter. 

-Karen


Sunday, December 20, 2015

Holiday Ornament Swap and Blog Hop

Just over a month ago, I sent out an invitation to participate in my first annual Ornament Exchange and Blog Hop.  Time has truly flown by and today is the day for the Blog Hop Reveal!

We had a small, but mighty group:


After I paired each participant with a swap partner, it was then up to them to exchange emails and handmade ornaments.  My only 'rule' for participation was that the ornaments had to be handmade by each participant and had to include at least one bead in the design.

 Thank you all for joining in for this bit of holiday cheer!  Liz and Becky don't currently have blogs of their own, so they sent me photos to share in a separate post here.  From my perspective, I love how these swaps allow me to get to know other beaders and artists from around the country a little better. 

I'm afraid the package that Carrie sent to me seems to have been temporarily lost in the mail.  It was coming from Hawaii, so maybe it decided to spend an extra day, or maybe a week or two hanging out at the beach before making it's way to oh-so-rainy Seattle.  Can't really say that I'd blame it!   Even still, it's been fun getting to know Carrie better as we exchanged emails regarding our holiday traditions and favorites.

While Carrie enjoys many of the more 'traditional' holiday themes, she admitted that since she's lived in Hawaii, she's "grown to be a fan of the local Christmas themes such as volcanoes, seahorses, hono (sea turtles), pineapples, monstera leaves, petroglyphs, palm trees, coral, jellyfish, starfish and reef fish".  Reading that, my original plan to send her a more traditional holiday ornament began to morph.

She also mentioned that her favorite color is the new Toho 2600F "Lemongrass", followed by "lime greens, teals, orange, orange-reds, periwinkles".  She continued "pretty much I love all the greens - especially olives and limes, oranges. Bronze/Browns/Coppers/Silver - all good."

So not necessarily the normal Christmas colors.  Can you guess where this is going?  Yep, I decided to make her an ornament in my Happy Fish series.  Because it was going to be a Christmas ornament, I decided to work with an ogee pattern for the scales.  What could be more ornament-shaped, right?

Here's what I finally came up with:


Happy Fish ornament in oranges and greens with rasberry and bronze accents.
My newest Happy Fish, all decked out in her holiday splendor

I wrapped the little fish up in a hand-painted box, then added a couple of other things to the shipping box, including some of my biscotti and a little paper ornament I made.

A peek inside the package before I closed the lid
I haven't heard yet what Carrie thought about my unorthodox creation.  I'm truly hoping she liked it.  In the meantime, I know that I had an absolute blast stitching my newest Fish friend.

Now, be sure to check out everyone else's ornaments, and I promise to post Carrie's as soon as it arrives.


Ornament Swap Partners Becky Clay and Liz Hart


Liz took this photo of the package she sent to Becky
Becky Clay and Liz Hart were definitely on the same wavelength with their ornament exchange, despite some initial difficulties in connecting via email which left very little time to stitch.  Both choose to use Sandra Halfpenny's Snowflake patterns.

Liz started making snowflakes from Sandra's designs, then started playing.  The white one is  Sandra's Snowflakes Falling. She mentioned that the pattern is available on Sandra's blog as a Christmas gift to her readers.  The other two designs Liz sent were hers; same design with different beads.

Becky's icicle was a free icicle pattern she picked up from  TheBeadsKnees that isn't currently available, unfortunately.


Becky's photo of the Snowflakes she sent to Liz

Becky's icicle, along with a closeup to try to show the beading. 

Not all of Liz's snowflake experiments went according to plan, as she shares in this process photo.  Oops!
List sent along the photo above with the note "You'll get a kick out of this process pic - it seems my fingers and brain weren't connecting very well!"

And here's one last photo from Liz of the snowflakes she stitched for Becky.  Lovely!

Sandra Halfpenny's Snowflake Falling and Liz's continued experiments

To see what everyone else made and received, check out the list below:

Friday, December 18, 2015

Let it Snow this Sunday at Fusion Beads

I love the soft, vintage colors of this 7-pointed star ornament
Looking at the ten-day forecast for Seattle, it's looking far more likely that we'll have a Wet, rather than a White Christmas.  But no matter! There will be snow flurries a plenty this Sunday at Fusion Beads, where I'll be teaching my third-annual Snowflakes and Stars workshop. 

Happen to be in Seattle this weekend? 
Whether you need a quick last-minute gift or simply want to treat yourself, consider joining me for an afternoon of some holiday beading fun. 

Not in town?  My Snowflake and Stars tutorial is available through my Etsy Store as a PDF download.  It's also not too late to claim your free copy of my Snowflake Chains holiday special.  I've extended the offer through January 2nd, 2016.  

Monday, December 14, 2015

Snowflake Chains - Update for my Snowflake & Stars Tutorial

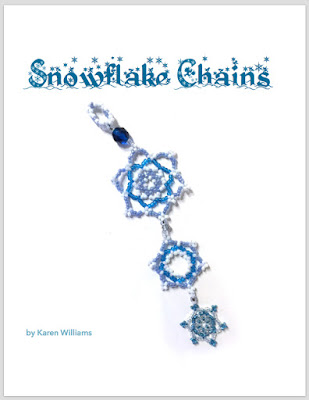
The cover page for Karen Williams' Snowflake Chains tutorial featuring a three-tiered snowflake ornament
Cover page for Snowflake Chains special update
Snowflake Chains, I like to think of them as the Daisy Chains of Winter.  Most of the snowflakes I create are stand-alone, solitary individuals.  But sometimes, I want a spill of snowflakes.  That's when I start making snowflake chains.

I spent last week writing up the instructions for how to make these chains as a special update for my Snowflakes and Stars tutorial, my original PDF tutorial.  It's still one of my favorites because it offers so many possibilities.  Like real snowflakes, there's infinite ways to vary the basic patterns to create new designs.  It's a pattern I tend to revisit every year as the holidays approach.

This latest update includes a quick review of basic snowflake construction, then shows how I made the second and third stars in the line.


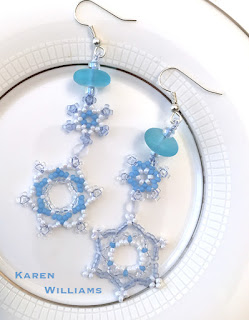
each earring features two linked snowflakes, topped with a cultured sea glass bead.
Earrings made with Snowflake Chains
If you already own a copy of my basic tutorial here's what you need to do to claim your FREE copy of this update:
  1. Sign up for my mailing list (if you're already on my mailing list, then you're a step ahead)
  2. Let me know where you purchased a copy of the original tutorial (this also includes snowflake kits and in-person workshops). 
  3. Bonus: Send me a photo of one of the snowflakes you made using this tutorial.  This last isn't strictly necessary, but I think it would be fun to put together a blog post showcasing everyone's snowflakes. 
Otherwise, you can claim your free copy of this special update when you purchase a copy of the base Snowflakes and Stars tutorial from my Etsy store.
  1. Sign up for my mailing list (if you're already on my mailing list, then you're a step ahead)
  2. Purchase the tutorial on Etsy.  Write "SnowflakeChains" in the notes to seller on Etsy.  Make sure to include your email as well, so I can send you the link to download your special update!
 This offer is good through December 24th, January 2nd, 2016. 


A seven-sided star  - one design made based upon Karen Williams' Snowflakes and Stars tutorial
The base tutorial - Snowflakes & Stars
As I noted in my previous post, I'm trying to simplify my life as a solo, working artist.  It can be so hard to juggle the time necessary to produce and document my work, write my patterns, design the illustrations, and keep up with everything else.  I love what I'm doing, but I have to learn to do it smarter if I want to be able to continue.

At the same time, I am incredibly grateful to my friends and supporters who have helped me continue to work in the field.  Without you, I wouldn't be able to do what I love.  With all of that in mind, I've decided one way to simplify things while also saying thanks to you, my strongest supporters, is to announce updates to my various tutorials via my newsletter.  I'll follow up when I can here on my blog, but the primary source will be my email newsletter.  If you own the original pattern and want the update, my newsletter will include simple (I hope) instructions on how to claim it.  And if my instructions ever seem crazy, just let me know that too!  :0)


Happy Holidays!

Oh, and in case you're interested, I will be teaching my Snowflakes and Stars workshop in person at Fusion Beads in Seattle this Sunday, December 20th from 2:00-5:00pm.  This is the closest to Christmas that I've ever taught this class.  If you're in the area and would like a beady break from last-minute holiday prep, come join me!

To sign up, you'd need to call the store at 206-782-4595.
782.4595#sthash.YxKepKSa.dpuf


Tuesday, December 1, 2015

New PDF Tutorial: Criss-Cross Lantern Beads with Right Angle Weave

Preparing for a workshop early last month, I pulled out the pattern for my Cap Beads from my book Corsets, Caps & Stays: Elegant Beaded Beads.  What would happen, I wondered, if I used some of the fun, shaped beads that have come out since then?  My new Criss-Cross Lantern beads are the result. 

I promised my students that I'd send them the revised instructions, including this variation.  And here it is, nearly a month later!  I've heavily revised the original pattern, doubling the number of detailed bead diagrams and added all-new instructions for the Lantern Bead variation. 

The Lantern Ornaments Beaded Beads PDF pattern is now available in my Etsy store.   To celebrate its release, I'm offering a special deal. 

 
2015 Holiday Special

** If you purchase a copy of my original Corsets, Caps & Stays book (either paperback or digital versions) now through December 15th, I will include the download code for my Lantern Bead PDF tutorial with your purchase. 

** Also, for friends who already own a copy of my original Corsets book and are on my mailing list, my next newsletter update will include instructions for how you can claim your free copy of this new pattern.  

To simplify my life, I've decided to post all free updates via my email newsletter from now on.  There's only one of me and trying to keep track of who purchased what, from where, and when gets to be sooo crazy, especially since I have no way of tracking Amazon sales.   Trying to track everything takes up a tremendous amount of time that I could otherwise use for designing, beading and writing.  From now on, I'll post update opportunities in my email newsletters, along with simple instructions on how to claim your PDF updates for my patterns that you've previously purchased. 

Not on my mailing list?  Click here to sign up.  Normally I send out one to two email updates per month, sometimes a little more, sometimes a little less.  It all depends on what's going on. 

This month, I've decided to get ambitious!  My plan is to send out a special update every Wednesday, starting tomorrow for the next three weeks, with a new pattern addition or update code.  If you already own the base pattern (or purchase it during my promotion), you'll receive the updates for free.   Next week I'll be sending out an addition to my Snowflakes and Stars tutorial.  This is my way of saying thank you for helping to make it possible to do what I do!