Studio Musings

Monday, April 11, 2016

New Classes at Fusion Beads this Summer

I'm teaching two new classes at Fusion Beads this summer.  In July, I'll be sharing my spin on more freeform bead embroidery with my Happy Fish.  These little guys, my newest additions to my underwater menagerie of beaded fish friends, were inspired by Robin Atkin's Bead Journal Project.  I needed a theme I'd enjoy working with for a year, and smiling fish fit the bill. 

And in August, I'll focus on the techniques I used to create my Nautillus Flower Cuff, from Explorations


Sign-ups for Summer workshops begins this Thursday, April 14th.

If you're planning to visit Seattle this summer, definitely check out their classes catalog. They have one of the best, most varied schedules you'll see outside of a major beading conference. 


Thursday, March 31, 2016

Extending Signups for the Spring Ring Fling

Want to join in the fun of the Spring Ring Fling Blog Hop and Challenge?  There's still time as I'm extending the signup date until April 10th.  The final reveal will still be on May 1st.

Why Sign-up the Challenge?

* Themed Blog Hops are a great way to share your work with people who understand!  Reading the comments left by other, wonderfully creative people and kindred spirits can be a true gift.    

* Like taking a workshop, challenges can jumpstart your creativity.  Better yet, they are completely free, and you can web surf in your pajamas, at the coffee shop, or in-between innings at the softball game. 

* Freeform Peyote Rings are FAST!   It feels so good to be able to finish a project in a reasonable amount of time.  Compared to larger freeform beadweaving projects, you can complete a ring in a number of hours, rather than days, weeks or months.  If you're like me, and haven't started your challenge project yet, it's okay.  There's still plenty of time.   

* Because they're so quick to make, rings are perfect places to experiment!  Simple or completely over-the-top, freeform peyote rings can really shine.  I'll admit, I always thought I preferred to wear simple rings.  My earliest freeform peyote creations reflected that.  But the more I played (and learned from the students in my workshops fearless creations), the more I realized just how much fun wearing an over-the-top signature ring could be. 

* Wearing a funky ring is a great conversation starter.  Try it!  Wear your ring to an office party or out for brunch.  People are much more comfortable staring at your hands than at your cleavage (the big problem with necklaces), so people are much more likely to ask you about your ring.  Rings are also easier to take off to let someone else take a closer look at your work.  

* Everyone is invited to join in, whatever your familiarity or skill level with freeform peyote.  The goal here is to challenge yourself and choose your own adventure.   Your piece must include freeform peyote, but may include other beading stitches or mixed media techniques as well.

On the reveal day, post a photo (or photos) of what you made and include a paragraph or two about your piece.  If this is your first time working with freeform peyote, tell us about your experience.  

Don't have a blog?  No problem!  As long as you can email me photos and text, I'll make sure you're included in the hop as a guest post here on Baublicious.

* To sign up, email me (skunkhillstudio at gmail dot com).  Make sure to include your name, email address and blog URL (if you have one).   Or leave a comment with your email address on this post, telling me you'd like to join in.

I'll look forward to hearing from you. 

Tuesday, March 8, 2016

Join me for a Spring Ring Fling Blog Hop and Challenge!


Ready for a new freeform peyote Blog Hop and Challenge?  Join me for a Spring Ring Fling!

I don't know about you, but I'm in need of a little push, and this challenge seems like just the thing.  Let your creativity blossom with the season.  Make one or more freeform peyote rings; extra points for "Spring" based designs. 

Rings are especially fun because they can be stitched in an afternoon, making them especially suited for trying out new ideas and color combinations.  You only need to make one ring, but you're welcome to make as many as you'd like. 

      Sign up through March 31st


Signups:                         through March 31st
Blog Hop & Reveal:     Sunday, May 1st (May Day!)

To Signup:
Email me (skunkhillstudio at gmail dot com) including your name, email address and blog URL.   Or leave a comment with your email address on this post, telling me you'd like to join in. If you don't have a blog but would like to participate, let me know - as long as you can email me photos and text, I'll make sure you're included in the hop. 

I will compile a list of participants to include in our posts for the reveal date, and also keep you informed of any changes or special happenings.

Rules:
Everyone is invited to join in, whatever your familiarity or skill level with freeform peyote.  The goal here is to challenge yourself and choose your own adventure.   Your piece must include freeform peyote, but may include other beading stitches or mixed media techniques as well.

On the reveal day, post a photo (or photos) of what you made and include a paragraph or two about your piece.  If this is your first time working with freeform peyote, tell us about your experience. 

Resources
Need inspiration?  Check out my last two blog posts; they are all about the rings I've been making lately.  The Freeform Peyote Facebook Group is another great resource.  And if you're looking for books, my 2014 book Explorations in Freeform Peyote Beading includes a separate section on creating freefrom peyote rings, or check out Volume 1 of my ebook series.


     Blog Hop Sunday, May 1, 2016

Hope you'll join me!

(Many thanks to Sarah Sequins for suggesting the name!)

Thursday, February 18, 2016

More Freeform Peyote Rings - my new 'Spring Woods' Collection

Last week I shared a couple of Valentine's Rings I made in preparation for my weekend workshop on the topic at Fusion Beads.  This week, I thought I'd share the two rings I started in class. 

Going into the class, here's the one I'd originally planned:

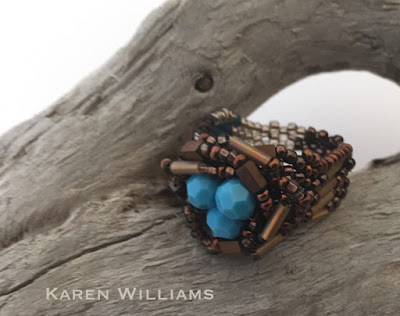
Robin's Nest ring with three crystal 'eggs' by artist Karen Williams
Robin's Nest ring with three crystal 'eggs'

I wanted my own "Robin's Nest" ring, complete with crystal 'eggs'.  One of my students asked about incorporating bugles into a freeform peyote ring.  This was the perfect chance to use some 6mm bugles both in the base and while building the nest. 


an alternate view of the Robin's Nest ring by Karen Williams
you can almost see the bugles I used in the band from this view
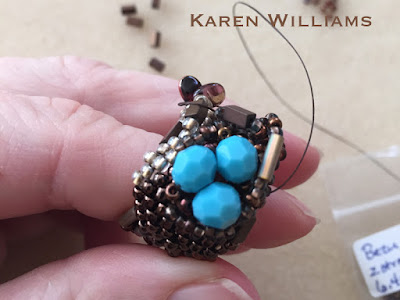
The Robin's Nest was a great example of adding embellishments after building the bulk of the ring.  After I finished the base ring, I positioned the three eggs, then began building the nest around them.  (Not quite how mama Robin would have done things, but it worked for me).

Just starting to work on the 'nest'.  Freeform peyote ring by Karen Williams
Just starting to work on the 'nest'

Helping my students in class, I decided I also needed a sample where I added my focal bead in the first row/ring.  So I ran out into the store and purchased a 10mm round druzy that worked with the bead colors I had with me.  I'm really, really bad about taking process photos while I'm teaching, since my focus is on my students, not my work.  So I don't have a single process photo for this ring. 

Dogwood Blossom freeform peyote ring by Karen Williams
Dogwood Blossom pinky ring
You can't really tell that the focal beads is a druzy in the ring's final incarnation.  It's entire look changed when I decided at the last minute to try adding some pressed glass leaves as flower petals around the core.   The 'petals' reminded me of a dogwood blossom, so I decided to run with it.  But they wanted to flop closed, so I added some beading inside the and between the ring of petals to hold them open. 

The funny thing is this ring's band is one of my smallest - sized to fit my pinky - while the dogwood blossom makes it one of my largest rings. 

Spring Woods freeform peyote rings by Karen Williams
Both rings side-by-side for comparison
Here you can see both rings together for comparison.   I've decided they are my new Spring Woods collection, created using a soft, muted palette of warm browns, antique coppers and lilac, with splashes of sky blue and olive green that reminds me of the earliest days of spring. 

I also found myself thinking that both rings would be right at home in the Hundred Acre Wood. 

Wednesday, February 10, 2016

Freeform Valentine Rings

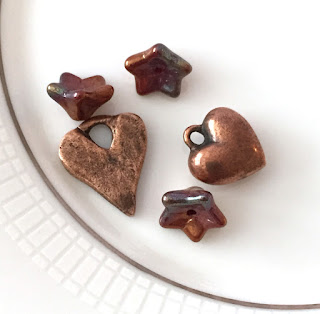
Valentines charms by Nunn Design along with some bellflower pressed glass beads
Heart charms by Nunn Designs & pressed glass bellflowers
I'm typically not a huge fan of Valentine's Day - it tends to be way too pink and a little too sweet for me.  But this year, I decided to jump into the festivities with a couple of new freeform peyote rings.

It started with a trip to Fusion Beads to drop off class proposals for their summer session.  Since it was right before my Rings workshop, I decided to pick up a couple of new focals for new rings, and since it was almost Valentines Day, I decided, why not? 

Especially when I found these fun heart charms by Nunn Design.  The rustic, weathered look of the antiqued copper immediately made me start thinking of alternate "Valentine" color palettes.

Bead palette in purples & coppers - did not use all of the beads, and added some alternate beads in process.
My color palette focused on purples & copper instead of pinks & golds
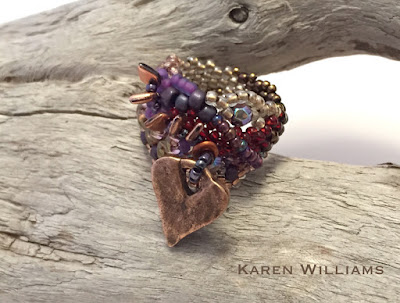
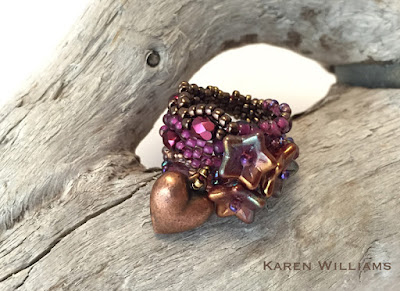
Prickly Heart freeform peyote ring by Karen Wiliams
"Prickly Heart" ring
My Prickly Heart ring includes a jagged line of twin beads which reminded me of stitches mending broken hearts. It's my experience that even in the best relationships, there's bound to be some heartbreak - the key is to mend it as best you can.  Here 'the' scar has become something beautiful.  I also added a line of five of the new dragonscale beads, which reminded me of arrowheads from Cupid's quiver.  And I finished it off with Nunn Design's rustic heart charm

side view of Prickly Heart freeform peyote ring by Karen Wiliams
You can really see the 'arrow heads' in this view

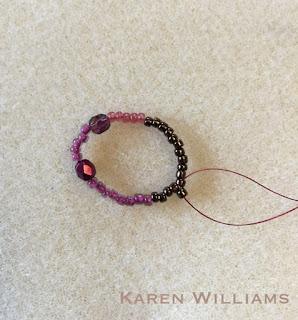
Staring circle of beads with a stop bead
Staring circle of beads
I was having so much fun, I decided to make a second ring with the puffed heart charm.  With both rings, I started with a simple circle of beads, then built up my base using freeform peyote. 

The goal here was to create an interesting base that I could then embellish with the charms.  Both the charms and pressed glass flowers are thread magnets - so I prefer to add them at the very last moment.   With both rings, by the time I finish building the base, I ended up debating with myself whether or not I really wanted/needed to add the additional embellishments. 

Here's a photo I snapped of my second ring before I started embellishing, so you can see what I mean:


the color palette and 4mm fire-polished provide subtle texture
Be Mine Ring before I added embellishments

I really debated whether I wanted to stop here.  Except I was in a "more is more" mood, and I still had the puffed heart charm burning a hole in my bead mat, so I kept stitching. 

Be Mine freeform peyote ring by Karen Williams with three bellflower pressed glass beads and a puffed heart charm
Flowers and a Valentine
I added the puffy heart charm on a short tether, then decided to add a little bouquet to finish things off.  What says 'Be Mine' more than flowers and a Valentine? 

I've worn both rings several times in the past week, and everywhere I go people comment.  They are intrigued by the fact that you can make rings out of beads (of course we can!).  It seems to be a toss up as to which people like more.  The charms make the rings especially fun to wear.  Because they are both sewn on short tethers, they can flip and turn, and add a dynamic element.  Such fun!

Last week I sent out a 'sneak peek' to my friends on my mailing list, something I've not done before.  My thought was to send it out early enough to give people time to make their own V-Day rings, if they wanted, because I seldom think of lead time.   One of my bad habits. 

So there's my first ever Valentine's beading.  Really! In all the years I've beaded, I don't think I've ever made anything for Valentine's Day before. 

Do you bead for Valentine's Day?  What do you make?  

Happy Valentine's Day!  Hope you have a wonderful time this weekend, whatever you decide to do. 

Friday, January 29, 2016

Carrie Johnson's Holiday Ornament

Back in December I hosted my first  Ornament Swap and Blog Hop.  It was great fun, and I think everyone was pleased with the ornaments they were sent.  Except for one package which decided to take the slow boat to it's final destination.  I am so pleased to announce that it did indeed arrive, and was totally and completely worth waiting for!  I'd like to present the extremely-talented Carrie Johnson's gorgeous design:

Ornament and Photo by Carrie Johnson

Carrie also sent a fantastic write up, so I'm going to include it here, verbatim:

"After several back and forth emails, I had a better idea of what Karen might like in her ornament.  First, I had to find the perfect color combination that used jewel tones, but that would also have a slight Victorian overtone.

For the seed beads I went with bronze and wine metallic colors in addition to the cabaret permanent finish for the center herringbone section.  I used both Lt. Siam and Garnet Swarovski crystals.  Originally I tried to use royal blue on the outside of the arms in the ornament – but it just kept fighting me.  I even tried to use blue for the center Swarovski rivolis but they just didn’t pop and instead faded into the background.  So, I finally took the blue out (even though I wanted the contrast) and things finally came together.


Side view of Carrie's finished ornament

I had the idea of creating an open shape which you could look inside to see the middle – and you can see the resulting ornament.  It was made using one of my favorite stitches – a variation on cubic RAW in addition to CRAW, herringbone and peyote stitch.  I tried adding fringe and dangles from the bottom of the ornament, but it was just a distraction (and would probably get caught in the tree anyways).  In the end – I was thrilled to have everything fall into place with the ornament being very elegant and clean, utilizing Victorian colors and shapes, but at the same time giving them a modern twist.  It is my hope that this will become one of Karen’s Christmas ornament treasures!
"

 The finished ornament has a wonderful three dimensional effect that reminds me of a lantern, while the colors she chose are indeed perfect! 


Carrie was gone for several days right around the time that I sent her package, and she wrote that when she returned "there was a package just waiting to be opened by my front door.  I stared at it for several days, just dying to open it.  But, I thought it would only be fair to wait until the package that I sent to Karen, my wonderful ornament exchange partner, had been delivered."

How sweet was that?  Her package arrived around 5:00pm on Christmas Eve (yes, I've had it awhile, I was waiting for her write up to make the post and time got away from me!)  But I absolutely love  Carrie's design, and the colors.  It did NOT get packed away with the regular holiday ornaments, but is decorating my workspace as I type.  Today is another chilly, rainy Seattle day, but Carrie's ornament makes me smile!

And luckily, Carrie enjoyed the little Happy Fish that I sent to her as well; "As for the secret ornament in my package – what an awesome surprise.  My “little” fish is just stunning, using my two favorite colors - green and orange.  In addition, it uses an island theme which has become a featured part of my holiday decor since moving to Hawaii.  I’m honored to have received such a beautiful, handmade ornament – I will truly treasure it!"

Phew!  The little guy was so different from my normal holiday ornaments that I'll admit to being a little scared that Carrie would look at it think I'd gone crazy. 

Before I end this post, Carrie also shared several pictures of her ornament in progress:

Carrie Johnson - bezeling the center rivolis

Carrie Johnson - building the structure

Carrie Johnson - adding the rivolis

Oh, and Carrie also let me know that she was indeed the one who sent me the honu cookie cutter!  Mystery solved.  She wrote that she "went to over 10 local stores and specialty stores, and NOBODY had any Hawaiian themed ornament cutters.  It was crazy, I finally had to order one from the mainland and have it sent to you."

Thank you Carrie!  This was one of my best Christmases in a very long time, and partnering with you for the Ornament Swap had a lot to do with it.  Making and receiving handmade gifts, it truly is powerful.

Wednesday, January 20, 2016

Ocean Menagerie - Crocheted Extravaganza


My new ocean menagerie, thanks to my amazing sister!
2016 has been a bit of a slow start in terms of my own creativity, so I thought I'd share the work and artistry of one of my favorite people in the world, my sister Shawna.

Last Christmas (2014), Shawna shared that she'd been working on a present for me, but it wasn't 'quite' done, and asked if I'd prefer to receive what she'd accomplished to date, or whether she should continue working on it.


My new favorite afghan!
In one of my clever moments, I asked which she would prefer.  Smart, smart, smart!   She said she'd like to keep working; to which I smiled and agreed wholeheartedly.

In early December, I had a chance to fly out to visit family.  The last night of the visit, Shawna brings out this HUGE wrapped present, with her boys 'helping' her carry it and grinning from ear to ear.  The box was big enough to fit my 8 year old nephew - I know this because he hid in it later and my brother brought me my new 'gift' - to much giggling from my nephews. 


I thought maybe she was working on a new afghan.  There was indeed an afghan at the top of the box - one of my sister's original designs, shading from deep ocean into the shore, with sand and sea foam around the edges.  In the color transitions, she crocheted beautiful wave patterns to continue the theme.

Under the afghan, I found an entire menagerie of crocheted ocean creatures.  Some so small they fit in the palm of my hand!  Here are some closeups:

He keeps making me sing songs from The Little Mermaid

The little harp seal hanging out with its octopus and jellyfish friends
Fancy Goldfish!  Shawna included these freshwater fish because I love them so

Her conch shell is fully three-dimensional and sooo detailed

Little Squidly in the 'surf' afghan

Shawna even made me a sea anenome and sea fan!
Hippocampus gigantica rosaceus
Flying with friends
She says that in the beginning, most of the designs came from free patterns off of the Internet.  But as she worked she began to develop her own designs as well.  Everyone then told stories of watching Shawna work on them at family gatherings over the past two years. 

Luckily, I'd brought an extra suitcase filled with Christmas presents for my family.  I'd hadn't planned to bring it back home with me.  On the return trip, I packed all my clothes in it and all of my new friends into my carry-on bag. 

This little guy to the right managed to escape the confines of the suitcase, and hung out with my while waiting for our flight.  He managed to amuse more than one fellow passenger, especially when a few of his friends started peaking out as well.  There was no way I was trusting them to the airlines!


Back home,  my newest friends made themselves right at home under the Christmas tree. 
  
Keeping an eye on things
The Great Escape (attempt)

After presents were unwrapped, it looked like they were all fleeing the scene.  The little clam/pearl had abandoned its shell and the crab was fleeing towards the front door.

Normally, after the unwrapping, the Christmas tree looks pretty bare.  Not this year!  Once we'd rounded everyone back up and put them back in place, they kept the tree looking quite full and festive until it was finally time to say goodbye to Christmas.

I haven't decided where their every day home is going to be.  Right now they're slowly migrating through the house.  Popping up here and there as Joe and I make little surprise appearances for each other.  A shark peaking out from a cupboard, a wolf eel keeping close watch over a laptop, the skate guarding the remote, ready to watch tv.  That sort of thing. 

One more shot of the full menagerie
Thank you Shawna!