Studio Musings

Thursday, October 27, 2011

Hedgehogs and Oak Leaves

Art Bead Scene caught me with their challenge this month.  How could I resist an illustrated still life entitled "A Hedgehog in a Landscape"?  Painted by Giovanna Garzoni (1643-51), one of the first woman artists in her field, this piece is a collection of some of my very favorite things.  This time of year, every trip outside my door is a chance to collect (or photograph) brightly colored leaves, mahogany colored buckeyes, and the prickly outer hulls of chestnuts.  A hedgehog in the garden would be just perfect. 

Since I'm unlikely to find a hedgehog in my garden, I thought I'd create my own little critter, and treat myself to an artist play date in the process.  So I broke out the polymer clay supplies and set to. 
wood & aluminum forms, cooked poly clay, painted & waxed

I'm a poly clay dabbler at best, so wasn't trying for anything fancy here, though I did manage a couple of nice Skinner blends. Started with aluminum foil crunched into the approximate shapes I wanted (I used my cat's toy mice as a reference), then pulled out some wooden beads, too.  If I was going to the trouble of pulling out all the supplies, might as well make a few different things.

While they cooked, I played with some wire, creating oak leaf charms.  They got better as I worked - my first wraps were pretty 'rustic'.  (Kinder word than 'crude').

Once they were out of the oven, I had a little fun with acrylics and finished them with a wax varnish.  I'd carved oak leaves into one of my beads, which left little clay burrs around the edges.  400 and 600 grit wet/dry sandpaper took care of the burrs without disturbing my design,but left the surface looking rather dull.  The acrylics and varnish took care of that  beautifully, giving the bead a deep lustre. 


Then it was time to stitch my hedgehog his coat. 

A right angle weave 'coat' with a pink underbelly
Stitched the belly flat using right angle weave, then tied it onto the hedgehog with bead 'ropes'.  The bottom-left photo above shows my "bondage" hedgehog.  :)  Then I filled in between the rows, using increases and decreases as necessary to fit the curves.

 And here's my little guy with his new coat!  I'd originally thought of adding an extra layer of bead work on top to give him a really spiky look, even started in on it, but decided I liked this better.

I glued his eyes in last - they're size 6 seed beads.  With the addition of a pin back on his belly, he's ready to travel.  Though he'd make a great pocket pet as well. 


And what did I do with the rest of the beads, and the leaf charms?

Oak Leaf lariat with poly clay beads & freemotion leaf

I used a couple of my beads in this lariat, along with some machine wrapped cords and an oak leaf I'd made with free motion embroidery ages ago.   Fun to see how my different areas of work can come together. 

I also have plans to turn the rest of my wire leaf charms into earrings, next play day. 

Wednesday, October 26, 2011

How Many Times?

original pattern layout
I'm really starting to wonder exactly how many times I'm going to have to make and photograph this particular set of earrings in order to create a great pattern. 

In the first example, at right, the color's good, but the pattern isn't precise because when I made this pair, I wasn't worried about reproduction and was simply designing as I stitched. 

So I thought I'd try again.  Two pairs later, and I had one earring from each pair which fit the pattern, nicely photographed and documented.  Yeah! 

Back to my page layout....


2-page spread with new samples

But as I worked, I discovered several things.  1) I was missing one of the photographs I needed for my flat spiral earring.  2) I tended to flip the pieces back and forth in the photographs which confused me several times.  If it confuses me, I count it as a definite flaw in the instructions.  And 3) I didn't like having earrings from two different pairs - it seemed the patterns should be for a 'matched' set.

So, back to the drawing board...

2-page spread for one earring now - pattern's growing
I now have all the pictures I need for a matched set of earrings, the pieces are all facing the same direction in the photos.  And after restitching this pattern several times, I've proofed the text to within an inch of its life.  I've even added diagrams to my layout!

I showed the spread to my husband, triumphant to be making forward progress.  His comment?  The yellow is too similar to the background grey.  So, now I have to decide - do I leave it as is?  (I would agree that the yellow/blue/green color combination of these earrings isn't as visually interesting as the other combos).  Are they good enough?  Or do I try one more time? 

One of the photos in question - sufficient contrast or no?

Tuesday, October 18, 2011

A Month and a Day

With a white button down
It's been a full month and a day since the Bead Soup reveal, when I promised that I'd post pictures of my completed piece as soon as it was.  Finished it up late last week.  And as of a few minutes ago, I have pictures! 

I even made a set of earrings to match, to use more of Kim's wonderful beads, though I had a heck of a time trying to photograph them! 

So here's one last cup of bead soup before the next one in January.  Entries for January will be run by lottery, so don't know if I'll be in it, but I can hope! 


The grey turtleneck worked better for pics

The full piece

matching earrings with Kim's beads

Sunday, October 16, 2011

Synchronicity and Cross Training

For me, November is National Novel Writing Month and Nanowrimo with its challenge to write a 50,000 word novel in 30 days.  I'm an avid reader, always have been.  Give me a choice between watching tv and reading a book, I'll take reading any day.  And of course, I've always thought it would be great fun to write my own story.  So for the past two years, I've put aside both books and tv during the month of November to try and do just that. 

Frankly, I'm a horrid fiction writer.  I get bogged down very quickly in the story, and have yet to make it past the half way point in either of my novels despite reaching the 50,000 word goal by November 30th.  But here it is October and I'm gearing up for my third attempt.  Why you ask?  Good question, I've been asking myself that too.

Easiest answer - the only way I have any chance of writing a decent story is to put words to paper and Nano gives me a wonderful, built-in excuse to do so.  Also, it's fun - more than I would have expected.  Instead of living in someone else's world, with someone else's characters and choices, I get to make my own.  Anything can happen when I put pen to paper.  (Unfortunately not enough does or I wouldn't end up stuck mid-story).  And there's an amazing comraderie to the event - meeting at coffee shops for write-ins and sharing plot snippets and problems interspersed with furious bouts of typing.

Since I'd like to give myself the best possible chance of actually finishing my story this year, I signed up for a plot writing workshop by Renda Dodge, author and managing editor of Pink Fish Press.  So yesterday a friend and I made the trek up I-5 through the early morning fog to catch the Mukilteo ferry over to Whidbey Island for her last workshop before November.  Walking into the room at the Coupeville library, the excitement was palpable.  Her workshop offered such a feast of information that I felt like a glutton trying to drink it all in. 

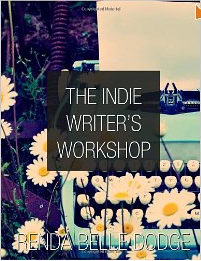
Fantastic Workbook!
Now my head is swimming with ideas and plots and plans.  Lucky for me, Renda has published The Indie Writer's Workshop.  If you've ever considered writing your own novel, you want this book in your library.  Renda has created a fun, comprehensive, easy-to-read and to use wookbook that is going to be my new best friend over the next month and a half.

At this point, I doubt I will ever show my fiction to another living soul.  But oddly enough, I've found it's a rather effective form of cross-training.  Committing to and following through on my first Nanowrimo challenge is what gave me the courage and confidence to tackle my non-fiction book project.  It's also how I first discovered CreateSpace (they're one of Nanowrimo's sponsors) and the new world of self-publishing. 

Next month, I'll once again be going completely outside of my personal creative box for some artistic cross-training of the literary variety.  And I invite any of you who are at all interested in trying your hand at writing a novel to join me! 

Tuesday, October 11, 2011

Special For Amy

Spiral Dancers:  ruffles and flat spirals
One of my students in my freeform peyote ruffles class this weekend was determined to recreate this set of earrings I'd made as a sample.  It had never even occurred to me that someone would want to do so - the class was focused on creating original pieces after all.  But hey, I'm game.

I think we did a pretty good job in class, just by looking at the bead structure.  But yesterday I decided to check my old files and sure enough, I had taken process photos as I made them, thinking I might use them in my book.

So, here you go Amy; I put together a Photo Essay outlining the steps to make both earrings.  The right earring is a flat spiral, while the left earring ruffles out and has cross bridges to link the ruffles.

Since I hadn't intended it as a pattern, the stitching pattern is somewhat erratic.  That being the case, I decided to make another pair to sort out the pattern.  So far, I've made two more pairs.

I fixed the pattern and then played with different ideas, and now have actual, someone-could-follow-it patterns. Can you believe it?  I plan to include them in the Freeform Peyote Ruffles ebook that I aim to publish before November 1st.  Starting with the 10-page handout from my class,  I'm expanding it to 20 pages, including patterns for these earrings and a pendant. 
The ruffle's the exact pattern, the flat spiral's a variation

The ruffle's the variation in this sample

Saturday, October 8, 2011

Whole Lot of Beading Going on

If you're in the neighborhood, drop by the Northwest Bead Society's annual Bead Bazaar at the Lynnwood Convention Center running today and tomorrow.  For the price of a $5 ticket for the weekend, you have access to a whole room full of the best sorts of vendors and enough free demonstrations to fill anyone's brain capacity. 

Here's the list of formal demonstrations (pulled from their website & links added):

Dragon Egg by Dana Cassara
10:30-11:15 Riveting Madness - Dana Cassara
Flush, ball and the one hit wonder. Riveting is fun, easy and a great way to incorporate hand-made elements into your bead work. Dana Cassara, owner of Danaca Design Studio, will show you three simple ways to rivet sheet metal and will suggest a variety of options for incorporating found objects into rivet projects. Pretty much, if you can put a hole in it you can rivet it!

11:30-12:15 Whirling Dervishes - Transforming flat peyote stitch - Teresa Sullivan
Transform flat peyote stitch into curved, lush dangles that evoke Egyptian papyrus fronds, martini glasses, and even fireworks!  Kits for lush lariats with beautiful dangly beads are available.

12:30-1:15 Wire Cloth and JewelryMaking, a Fiber Artist's Perspective - Marilyn Moore
Marilyn has a fiber art background and uses her textile techniques to produce interesting and unusual jewelry. See some of the tricks that she has come up with to make some truly unique items.

1:30-2:15 Understanding Lampwork Beads - Kendra Bruno 
International Society of Glass Beadmakers Executive Director & Fire and Rain Member
Small enough to hold in the palm of your hand, beads have been a form of adornment for 40,000 years. For close to 4,000 of those years, they have been made in glass! From conception to craftsmanship, this ancient art form is mesmerizing, but how do you know what to look for when purchasing these small wonders? Understand the creative process and gain the insight needed to shop with confidence in distinguishing artist-made glass beads from others.
Random Right Angle Weave

2:30-3:15 Random Right Angle Weave - KarenWilliams (yours truly)
Random right angle weave creates an open lacework or netting with the organic feel of the natural world rather than man-made symmetry or precision. No two pieces are ever the same, nor are they supposed to be.

I've put together a little postcard instruction sheet on random right angle weave - I've included the front image here.  (Now if I could only get my printer to work correctly!)


Time of My Life pendant by Melissa Cable
3:30-4:15 Faux Bone - Melissa Cable
Learn to work with this exciting, man-made product that simulates the look and feel of ivory. Melissa Cable is the author of "Spotlight on Wire" and teaches at shop and shows nationally. You can also find her locally at Fusion Beads.

Sunday, October 9th

11:30-12:15 Bead Embroidery - Carol Perrenoud, Beadcats
Bead Embroidery seems quite easy and straight forward, but there are lots of tips and tricks that will make it more enjoyable. Carol
will show stitches and discuss beadwork on wearables and and non-wearables.

12:30-1:15 Making needle felt beads and wearable art - Cynthia Toops
Making needle felt beads and wearable art. - Needle felting is an immediate, simple way to transform plain wool roving into any form you can imagine. Cynthia has been making felt jewelry for more than 7 years and is a featured artist in Lark Books new publication 500 Felt Objects."

1:30-2:15 Poor Mans Rolling Mill - Melissa Cable
Learn the basics of working with this innovative material that is as flexible as wire, as functional as metal and has the ability to showcase color like beads. A book signing will follow demo and copies will be available for purchase.

2:30-3:15 Not Round Beads - Lynne Hull
Lynn Hull an accomplished metalsmith, and the metalsmithing and jewelry instructor at North Seattle Community Collage, will demonstrate how to make beads using the hydraulic press.


And if that's not enough, the Seedbeaders will be hosting informal demos and tips & techniques throughout the weekend.

But I won't be there tomorrow, because I'll be teaching my Freeform Peyote Ruffles at Fusion Beads. Not the best planning on my part - but it definitely insures my weekend will be bead-filled!

Coral Dancer, freeform peyote ruffles